Author: q0v1jiho21d6

  • VCVerifier

    VCVerifier for SIOP-2/OIDC4VP

    VCVerifier provides the necessary endpoints(see API) to offer SIOP-2/OIDC4VP compliant authentication flows. It exchanges VerfiableCredentials for JWT, that can be used for authorization and authentication in down-stream components.

    FIWARE Security License badge Container Repository on Quay Coverage StatusTest CI

    Contents

    Background

    VerifiableCredentials provide a mechanism to represent information in a tamper-evident and therefor trustworthy way. The term “verifiable” refers to the characteristic of a credential being able to be verified by a 3rd party(e.g. a verifier). Verification in that regard means, that it can be proven, that the claims made in the credential are as they were provided by the issuer of that credential. This characteristics make VerifiableCredentials a good option to be used for authentication and authorization, as a replacement of other credentials types, like the traditional username/password. The SIOP-2/OIDC4VP standards define a flow to request and present such credentials as an extension to the well-established OpenID Connect. The VCVerifier provides the necessary endpoints required for a Relying Party(as used in the SIOP-2 spec) to participate in the authentication flows. It verifies the credentials using the Trustbloc Libraries to provide Verfiable Credentials specific functionality and return a signed JWT, containing the credential as a claim, to be used for further interaction by the participant.

    Overview

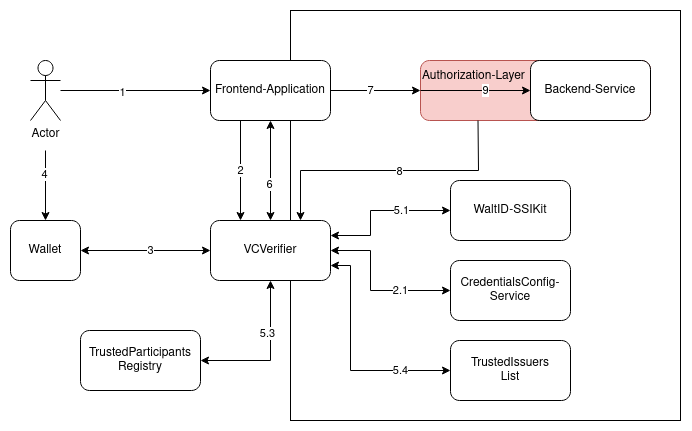
    The following diagram shows an example of how the VCVerifier would be placed inside a system, using VerifiableCredentials for authentication and authorization. It pictures a Human-2-Machine flow, where a certain user interacts with a frontend and uses its dedicated Wallet(for example installed on a mobile phone) to participate in the SIOP-2/OIDC4VP flow.

    overview-setup

    The following actions occur in the interaction:

    1. The user opens the frontend application.
    2. The frontend-application forwards the user to the login-page of VCVerifier
    3. The VCVerifier presents a QR-code, containing the openid:-connection string with all necessary information to start the authentication process. The QR-code is scanned by the user’s wallet.
      1. the Verifier retrieves the Scope-Information from the Config-Service
    4. The user approves the wallet’s interaction with the VCVerifier and the VerifiableCredential is presented via the OIDC4VP-flow.
    5. VCVerifier verifies the credential:
      1. at WaltID-SSIKit with the configured set of policies
      2. (Optional) if a Gaia-X compliant chain is provided
      3. that the credential is registered in the configured trusted-participants-registries
      4. that the issuer is allowed to issuer the credential with the given claims by one of the configured trusted-issuers-list(s)
    6. A JWT is created, the frontend-application is informed via callback and the token is retrieved via the token-endpoint.
    7. Frontend start to interact with the backend-service, using the jwt.
    8. Authorization-Layer requests the JWKS from the VCVerifier(this can happen asynchronously, not in the sequential flow of the diagram).
    9. Authorization-Layer verifies the JWT(using the retrieved JWKS) and handles authorization based on its contents.

    Install

    Container

    The VCVerifier is provided as a container and can be run via docker run -p 8080:8080 quay.io/fiware/vcverifier.

    Kubernetes

    To ease the deployment on Kubernetes environments, the helm-chart i4trust/vcverfier can be used.

    Local setup

    Since the VCVerifier requires a Trusted Issuers Registry and someone to issuer credentials, a local setup is not directly integrated into this repository. However, the VC-Integration-Test repository provides an extensive setup of various components participating in the flows. It can be used to run a local setup, either for trying-out or as a basis for further development. Run it via:

        git clone git@github.com:fiware/VC-Integration-Test.git
        cd VC-Integration-Test/
        mvn clean integration-test -Pdev

    See the documentation in that repo for more information.

    Configuration

    The configuration has to be provided via config-file. The file is either loaded from the default location at ./server.yaml or from a location configured via the environment-variable CONFIG_FILE. See the following yaml for documentation and default values:

    # all configurations related to serving the endpoints
    server:
        # port to bin to
        port: 8080
        # folder to load the template pages from
        templateDir: "views/"
        # directory to load static content from
        staticDir: "views/static/"
    # logging configuration
    logging:
        # the log level, accepted options are DEBUG, INFO, WARN and ERROR
        level: "INFO"
        # should the log output be in structured json-format
        jsonLogging: true
        # should the verifier log all incoming requests 
        logRequests: true
        # a list of paths that should be excluded from the request logging. Can f.e. be used to omit continuous health-checks
        pathsToSkip:
    
    # configuration directly connected to the functionality 
    verifier: 
        # did to be used by the verifier.
        did:
        # identification of the verifier in communication with wallets 
        clientIdentification:
            # identification used by the verifier when requesting authorization. Can be a did, but also methods like x509_san_dns
            id: 
            # path to the signing key(in pem format) for request object. Needs to correspond with the id
            keyPath:
            # algorithm to be used for signing the request. Needs to match the signing key
            requestKeyAlgorithm: 
            # depending on the id type, the certificate chain needs to be included in the object(f.e. in case of x509_san_dns)
            certificatePath: 
        # supported modes for requesting authentication. in case of byReference and byValue, the clientIdentification needs to be properly configured
        supportedModes: ["urlEncoded", "byReference","byValue"]
        # address of the (ebsi-compliant) trusted-issuers-registry to be used for verifying the issuer of a received credential
        tirAddress:
        # Expiry(in seconds) of an authentication session. After that, a new flow needs to be initiated.
        sessionExpiry: 30
        # scope(e.g. type of credential) to be requested from the wallet. if not configured, not specific scope will be requested.
        requestScope:
        # Validation mode for validating the vcs. Does not touch verification, just content validation.
    	# applicable modes:
    	# * `none`: No validation, just swallow everything
    	# * `combined`: ld and schema validation
    	# * `jsonLd`: uses JSON-LD parser for validation
    	# * `baseContext`: validates that only the fields and values (when applicable)are present in the document. No extra fields are allowed (outside of credentialSubject).
    	# Default is set to `none` to ensure backwards compatibility
        validationMode: 
        # algorithm to be used for the jwt signatures - currently supported: RS256 and ES256, default is RS256
        keyAlgorithm: 
        # when set to true, the private key is generated on startup. Its not persisted and just kept in memory.
        generateKey: true
        # path to the private key(in PEM format) for jwt signatures
        keyPath: 
    
    # configuration of the service to retrieve configuration for
    configRepo:
        # endpoint of the configuration service, to retrieve the scope to be requested and the trust endpoints for the credentials.
        configEndpoint: http://config-service:8080
        # static configuration for services
        services: 
            # name of the service to be configured
            -   id: testService 
                # default scope for the service
                defaultOidcScope: "default"
                # the concrete scopes for the service, defining the trust for credentials and the presentation definition to be requested
                oidcScopes:
                    # the concrete scope configuration
                    default:
                        # credentials and their trust configuration
                        credentials: 
                            -   type: CustomerCredential
                                # trusted participants endpoint configuration 
                                trustedParticipantsLists:
                                    # the credentials type to configure the endpoint(s) for
                                    VerifiableCredential: 
                                    - https://tir-pdc.ebsi.fiware.dev
                                    # the credentials type to configure the endpoint(s) for
                                    CustomerCredential: 
                                    - https://tir-pdc.ebsi.fiware.dev
                                # trusted issuers endpoint configuration
                                trustedIssuersLists:
                                    # the credentials type to configure the endpoint(s) for
                                    VerifiableCredential: 
                                    - https://tir-pdc.ebsi.fiware.dev
                                    # the credentials type to configure the endpoint(s) for
                                    CustomerCredential: 
                                    - https://tir-pdc.ebsi.fiware.dev
                                # configuration for verifying the holder of a credential
                                holderVerification:
                                    # should it be checked?
                                    enabled: true
                                    # claim to retrieve the holder from
                                    claim: subject
                        # credentials and claims to be requested
                        presentationDefinition:
                            id: my-presentation
                            # List of requested inputs
                            input_descriptors:
                                id: my-descriptor
    	                        # defines the infromation to be requested
                                constraints:
                                    # array of objects to describe the information to be included
                                    fields: 
                                        - id: my-field
                                          path:
                                            - $.vct
                                          filter:
                                            const: "CustomerCredential" 
                                # format of the credential to be requested
                                format:
                                    'sd+jwt-vc': 
                                        alg: ES256

    Templating

    The login-page, provided at /api/v1/loginQR, can be configured by providing a different template in the templateDir. The templateDir needs to contain a file named verifier_present_qr.html which will be rendered on calls to the login-api. The template needs to include the QR-Code via <img src="data:{{.qrcode}}". Beside that, all options provided by the goview-framework can be used. Static content(like icons, images) can be provided through the staticDir and will be available at the path /static.

    Usage

    The VCVerifier provides support for integration in frontend-applications(e.g. typical H2M-interactin) or plain api-usage(mostly M2M).

    Frontend-Integration

    In order to ease the integration into frontends, VCVerifier offers a login-page at /api/v1/loginQR. The loginQr-endpoint expects a state(that will be used on the callback, so that the calling frontend-application can identify the user-session) and a client_callback url, which will be contacted by the verifier after successfull verfication via GET with the query-parameters state(the originally send state) and code(which is the authorization_code to be provided at the token endpoint for retrieving the actual JWT).

    REST-Example

    In order to start a same-device-flow(e.g. the credential is hold by the requestor, instead of an additional device like a mobile wallet) call:

    curl -X 'GET' \
      'http://localhost:8080/api/v1/samedevice?state=274e7465-cc9d-4cad-b75f-190db927e56a'

    The response will be a 302-Redirect, containing a locationheader with all necessary parameters to continue the process. If the redirect should go to an alternative path, provide the redirect_pathquery parameter.

        location: http://localhost:8080/?response_type=vp_token&response_mode=direct_post&client_id=did:key:z6MkigCEnopwujz8Ten2dzq91nvMjqbKQYcifuZhqBsEkH7g&redirect_uri=http://verifier-one.batterypass.fiware.dev/api/v1/authentication_response&state=OUBlw8wlCZZOcTwRN2wURA&nonce=wqtpm60Jwx1sYWITRRZwBw
    

    The redirect should be taken and then answered via authentication_response-endpoint. Make sure that the vp_token and presentation_submission use Base64-URL-Safe encoding, instead of just Base64-encoding.

    curl -X 'POST' \
      'https://localhost:8080/api/v1/authentication_response?state=OUBlw8wlCZZOcTwRN2wURA' \
      -H 'accept: */*' \
      -H 'Content-Type: application/x-www-form-urlencoded' \
      -d 'presentation_submission=ewogICJpZCI6ICJzdHJpbmciLAogICJkZWZpbml0aW9uX2lkIjogIjMyZjU0MTYzLTcxNjYtNDhmMS05M2Q4LWZmMjE3YmRiMDY1MyIsCiAgImRlc2NyaXB0b3JfbWFwIjogWwogICAgewogICAgICAiaWQiOiAiaWRfY3JlZGVudGlhbCIsCiAgICAgICJmb3JtYXQiOiAibGRwX3ZjIiwKICAgICAgInBhdGgiOiAiJCIsCiAgICAgICJwYXRoX25lc3RlZCI6ICJzdHJpbmciCiAgICB9CiAgXQp9&vp_token=ewogICJAY29udGV4dCI6IFsKICAgICJodHRwczovL3d3dy53My5vcmcvMjAxOC9jcmVkZW50aWFscy92MSIKICBdLAogICJ0eXBlIjogWwogICAgIlZlcmlmaWFibGVQcmVzZW50YXRpb24iCiAgXSwKICAidmVyaWZpYWJsZUNyZWRlbnRpYWwiOiBbCiAgICB7CiAgICAgICJ0eXBlcyI6IFsKICAgICAgICAiUGFja2V0RGVsaXZlcnlTZXJ2aWNlIiwKICAgICAgICAiVmVyaWZpYWJsZUNyZWRlbnRpYWwiCiAgICAgIF0sCiAgICAgICJAY29udGV4dCI6IFsKICAgICAgICAiaHR0cHM6Ly93d3cudzMub3JnLzIwMTgvY3JlZGVudGlhbHMvdjEiLAogICAgICAgICJodHRwczovL3czaWQub3JnL3NlY3VyaXR5L3N1aXRlcy9qd3MtMjAyMC92MSIKICAgICAgXSwKICAgICAgImNyZWRlbnRpYWxzU3ViamVjdCI6IHt9LAogICAgICAiYWRkaXRpb25hbFByb3AxIjoge30KICAgIH0KICBdLAogICJpZCI6ICJlYmM2ZjFjMiIsCiAgImhvbGRlciI6IHsKICAgICJpZCI6ICJkaWQ6a2V5Ono2TWtzOW05aWZMd3kzSldxSDRjNTdFYkJRVlMyU3BSQ2pmYTc5d0hiNXZXTTZ2aCIKICB9LAogICJwcm9vZiI6IHsKICAgICJ0eXBlIjogIkpzb25XZWJTaWduYXR1cmUyMDIwIiwKICAgICJjcmVhdG9yIjogImRpZDprZXk6ejZNa3M5bTlpZkx3eTNKV3FINGM1N0ViQlFWUzJTcFJDamZhNzl3SGI1dldNNnZoIiwKICAgICJjcmVhdGVkIjogIjIwMjMtMDEtMDZUMDc6NTE6MzZaIiwKICAgICJ2ZXJpZmljYXRpb25NZXRob2QiOiAiZGlkOmtleTp6Nk1rczltOWlmTHd5M0pXcUg0YzU3RWJCUVZTMlNwUkNqZmE3OXdIYjV2V002dmgjejZNa3M5bTlpZkx3eTNKV3FINGM1N0ViQlFWUzJTcFJDamZhNzl3SGI1dldNNnZoIiwKICAgICJqd3MiOiAiZXlKaU5qUWlPbVpoYkhObExDSmpjbWwwSWpwYkltSTJOQ0pkTENKaGJHY2lPaUpGWkVSVFFTSjkuLjZ4U3FvWmphME53akYwYWY5WmtucXgzQ2JoOUdFTnVuQmY5Qzh1TDJ1bEdmd3VzM1VGTV9abmhQald0SFBsLTcyRTlwM0JUNWYycHRab1lrdE1LcERBIgogIH0KfQ'

    The post will be answered with just another redirect, containing the state and the code to be used for retrieving the JWT:

        location: http://localhost:8080/?state=274e7465-cc9d-4cad-b75f-190db927e56a&code=IwMTgvY3JlZGVudGlhbHMv
    

    The original requestor now can use to retrieve the JWT through the standarad token flow:

    curl -X 'POST' \
      'https://localhost:8080/token' \
      -H 'accept: application/json' \
      -H 'Content-Type: application/x-www-form-urlencoded' \
      -d 'grant_type=authorization_code&code=IwMTgvY3JlZGVudGlhbHMv&redirect_uri=https%3A%2F%2Flocalhost%3A8080%2F'

    which will be answered with(demo jwt, will be signed in reality):

        {
        "token_type": "Bearer",
        "expires_in": 3600,
        "access_token": "ewogICJhbGciOiAiRVMyNTYiLAogICJraWQiOiAiV09IRnU0SFo1OVNNODUzQzdlTjBPdmxLR3JNZWVyRENwSE9VUm9UUXdIdyIsCiAgInR5cCI6ICJKV1QiCn0.ewogICJAY29udGV4dCI6IFsKICAgICJodHRwczovL3d3dy53My5vcmcvMjAxOC9jcmVkZW50aWFscy92MSIKICBdLAogICJ0eXBlIjogWwogICAgIlZlcmlmaWFibGVQcmVzZW50YXRpb24iCiAgXSwKICAidmVyaWZpYWJsZUNyZWRlbnRpYWwiOiBbCiAgICB7CiAgICAgICJ0eXBlcyI6IFsKICAgICAgICAiUGFja2V0RGVsaXZlcnlTZXJ2aWNlIiwKICAgICAgICAiVmVyaWZpYWJsZUNyZWRlbnRpYWwiCiAgICAgIF0sCiAgICAgICJAY29udGV4dCI6IFsKICAgICAgICAiaHR0cHM6Ly93d3cudzMub3JnLzIwMTgvY3JlZGVudGlhbHMvdjEiLAogICAgICAgICJodHRwczovL3czaWQub3JnL3NlY3VyaXR5L3N1aXRlcy9qd3MtMjAyMC92MSIKICAgICAgXSwKICAgICAgImNyZWRlbnRpYWxzU3ViamVjdCI6IHt9LAogICAgICAiYWRkaXRpb25hbFByb3AxIjoge30KICAgIH0KICBdLAogICJpZCI6ICJlYmM2ZjFjMiIsCiAgImhvbGRlciI6IHsKICAgICJpZCI6ICJkaWQ6a2V5Ono2TWtzOW05aWZMd3kzSldxSDRjNTdFYkJRVlMyU3BSQ2pmYTc5d0hiNXZXTTZ2aCIKICB9LAogICJwcm9vZiI6IHsKICAgICJ0eXBlIjogIkpzb25XZWJTaWduYXR1cmUyMDIwIiwKICAgICJjcmVhdG9yIjogImRpZDprZXk6ejZNa3M5bTlpZkx3eTNKV3FINGM1N0ViQlFWUzJTcFJDamZhNzl3SGI1dldNNnZoIiwKICAgICJjcmVhdGVkIjogIjIwMjMtMDEtMDZUMDc6NTE6MzZaIiwKICAgICJ2ZXJpZmljYXRpb25NZXRob2QiOiAiZGlkOmtleTp6Nk1rczltOWlmTHd5M0pXcUg0YzU3RWJCUVZTMlNwUkNqZmE3OXdIYjV2V002dmgjejZNa3M5bTlpZkx3eTNKV3FINGM1N0ViQlFWUzJTcFJDamZhNzl3SGI1dldNNnZoIiwKICAgICJqd3MiOiAiZXlKaU5qUWlPbVpoYkhObExDSmpjbWwwSWpwYkltSTJOQ0pkTENKaGJHY2lPaUpGWkVSVFFTSjkuLjZ4U3FvWmphME53akYwYWY5WmtucXgzQ2JoOUdFTnVuQmY5Qzh1TDJ1bEdmd3VzM1VGTV9abmhQald0SFBsLTcyRTlwM0JUNWYycHRab1lrdE1LcERBIgogIH0KfQ"
        }

    Trust Anchor Integration

    The Verifier currently supports 2 types of Participant Lists:

    💡 The following example configurations are provided through the static yaml file. Its recommended to use the Credentials-Config-Service instead, to have the ability for dynamic changes. All described configurations are supported by the service in version >=2.0.0

    EBSI TIR

    In order to check an issuer against an EBSI Trusted Issuers Registry, it needs to be configured for the supported credentials. When using the file config, it would look like:

    configRepo:
        # static configuration for services
        services: 
            # name of the service to be configured
            testService: 
                # scope to be requested from the wallet
                scope: 
                    - VerifiableCredential
                # trusted participants endpoint configuration 
                trustedParticipants:
                    # the credentials type to configure the endpoint(s) for
                    VerifiableCredential: 
                    - type: ebsi 
                # scope to be requested from the wallet
                scope: 
                    - VerifiableCredential
                    - CustomerCredential
                
                      url: https://tir-pdc.ebsi.fiware.dev

    For backward compatibility, the EBSI List is the default at the moment, thus the following (simplified) configuration is also valid:

    configRepo:
        # static configuration for services
        services: 
            # name of the service to be configured
            testService: 
                # scope to be requested from the wallet
                scope: 
                    - VerifiableCredential
                # trusted participants endpoint configuration 
                trustedParticipants:
                    # the credentials type to configure the endpoint(s) for
                    VerifiableCredential: 
                    - https://tir-pdc.ebsi.fiware.dev

    Gaia-X Registry

    When using the Gaia-X Digital Clearing House’s Registry Services, the issuer to be checked needs to fullfill the requirements of a Gaia-X participant. Thus, only did:web is supported for such and they need to provide a valid x5u location as part of their publicKeyJwk. Usage of such registries can than be configured as following:

    configRepo:
        # static configuration for services
        services: 
            # name of the service to be configured
            testService: 
                # scope to be requested from the wallet
                scope: 
                    - VerifiableCredential
                # trusted participants endpoint configuration 
                trustedParticipants:
                    # the credentials type to configure the endpoint(s) for
                    VerifiableCredential: 
                    - type: gaia-x 
                      url: https://registry.lab.gaia-x.eu

    Mixed usage

    Its also possible to trust multiple list with different types. In this case, the issuer is trusted if its found in at least one of the lists. Configuration would be as following:

    configRepo:
        # static configuration for services
        services: 
            # name of the service to be configured
            testService: 
                # scope to be requested from the wallet
                scope: 
                    - VerifiableCredential
                # trusted participants endpoint configuration 
                trustedParticipants:
                    # the credentials type to configure the endpoint(s) for
                    VerifiableCredential: 
                    - type: ebsi
                      url: https://tir-pdc.ebsi.fiware.dev
                    - type: gaia-x 
                      url: https://registry.lab.gaia-x.eu

    Request modes

    In order to support various wallets, the verifier supports 3 modes of requesting authentication:

    • Passing as URL with encoded parameters: “urlEncoded”
    • Passing a request object as value: “byValue”
    • Passing a request object by reference: “byReference”

    Following the RFC9101, in the second and third case the request is encoded as a signed JWT. Therefor clientIdentification for the verifier needs to be properly configured.

    The mode can be set during the intial requests, by sending the parameter “requestMode”(see API Spec).Since requestObjects can become large and therefor also the QR-Codes generated out of them, the 3rd mode is recommended.

    urlEncoded

    Example:

        openid4vp://?response_type=vp_token&response_mode=direct_post&client_id=did:key:verifier&redirect_uri=https://verifier.org/api/v1/authentication_response&state=randomState&nonce=randomNonce
    

    byValue

    Example:

        openid4vp://?client_id=did:key:verifier&request=eyJhbGciOiJFUzI1NiIsInR5cCI6Im9hdXRoLWF1dGh6LXJlcStqd3QifQ.eyJjbGllbnRfaWQiOiJkaWQ6a2V5OnZlcmlmaWVyIiwiZXhwIjozMCwiaXNzIjoiZGlkOmtleTp2ZXJpZmllciIsIm5vbmNlIjoicmFuZG9tTm9uY2UiLCJwcmVzZW50YXRpb25fZGVmaW5pdGlvbiI6eyJpZCI6IiIsImlucHV0X2Rlc2NyaXB0b3JzIjpudWxsLCJmb3JtYXQiOm51bGx9LCJyZWRpcmVjdF91cmkiOiJodHRwczovL3ZlcmlmaWVyLm9yZy9hcGkvdjEvYXV0aGVudGljYXRpb25fcmVzcG9uc2UiLCJyZXNwb25zZV90eXBlIjoidnBfdG9rZW4iLCJzY29wZSI6Im9wZW5pZCIsInN0YXRlIjoicmFuZG9tU3RhdGUifQ.Z0xv_E9vvhRN2nBeKQ49LgH8lkjkX-weR7R5eCmX9ebGr1aE8_6usa2PO9nJ4LRv8oWMg0q9fsQ2x5DTYbvLdA
    

    Decoded:

    {
      "alg": "ES256",
      "typ": "oauth-authz-req+jwt"
    }.
    {
      "client_id": "did:key:verifier",
      "exp": 30,
      "iss": "did:key:verifier",
      "nonce": "randomNonce",
      "presentation_definition": {
        "id": "",
        "input_descriptors": null,
        "format": null
      },
      "redirect_uri": "https://verifier.org/api/v1/authbyValentication_response",
      "response_type": "vp_token",
      "scope": "openid",
      "state": "randomState"
    }.
    signature

    byReference

    Example:

        openid4vp://?client_id=did:key:verifier&request_uri=verifier.org/api/v1/request/randomState&request_uri_method=get"
    

    The object than can be retrieved via:

        curl https://verifier.org/api/v1/request/randomState

    The response will contain an object like already shown in byValue.

    API

    The API implements enpoints defined in OIDC4VP and SIOP-2. The OpenAPI Specification of the implemented endpoints can be found at: api/api.yaml.

    Open issues

    The VCVerifier does currently not support all functionalities defined in the connected standards(e.g. OIDC4VP and SIOP-2). Users should be aware of the following points:

    • the verifier does not offer any endpoint to proof its own identity
    • requests to the authentication-response endpoint do accept “presentation_submissions”, but do not evaluate them
    • even thought the vp_token can contain multiple credentials and all of them will be verified, just the first one will be included in the JWT

    Testing

    Functionality of the verifier is tested via parameterized Unit-Tests, following golang-bestpractices. In addition, the verifier is integrated into the VC-Integration-Test, involving all components used in a typical, VerifiableCredentials based, scenario.

    License

    VCVerifier is licensed under the Apache License, Version 2.0. See LICENSE for the full license text.

    © 2023 FIWARE Foundation e.V.

    Visit original content creator repository https://github.com/FIWARE/VCVerifier
  • baily

    Welcome to Remix!

    Netlify Setup

    1. Install the Netlify CLI:
    npm i -g netlify-cli

    If you have previously installed the Netlify CLI, you should update it to the latest version:

    npm i -g netlify-cli@latest
    1. Sign up and log in to Netlify:
    netlify login
    1. Create a new site:
    netlify init

    Development

    The Remix dev server starts your app in development mode, rebuilding assets on file changes. To start the Remix dev server:

    npm run dev

    Open up http://localhost:3000, and you should be ready to go!

    The Netlify CLI builds a production version of your Remix App Server and splits it into Netlify Functions that run locally. This includes any custom Netlify functions you’ve developed. The Netlify CLI runs all of this in its development mode.

    netlify dev

    Open up http://localhost:3000, and you should be ready to go!

    Note: When running the Netlify CLI, file changes will rebuild assets, but you will not see the changes to the page you are on unless you do a browser refresh of the page. Due to how the Netlify CLI builds the Remix App Server, it does not support hot module reloading.

    Deployment

    There are two ways to deploy your app to Netlify, you can either link your app to your git repo and have it auto deploy changes to Netlify, or you can deploy your app manually. If you’ve followed the setup instructions already, all you need to do is run this:

    # preview deployment
    netlify deploy --build
    
    # production deployment
    netlify deploy --build --prod

    Visit original content creator repository
    https://github.com/QuentinWidlocher/baily

  • llvm-svn

    llvm-svn

    This is an Arch Linux PKGBUILD for the LLVM compiler infrastructure, the Clang frontend, and the various tools associated with it. It’s available in the Arch User Repository as llvm-svn.

    Main development is in the master branch, while the AUR git repo is mirrored by the aur branch.

    IMPORTANT INFORMATION

    PLEASE READ THIS ONE CAREFULLY

    This is a fairly complex package. The only recommended and supported method of building is in a clean chroot as described on the Arch Wiki. A crude example is also provided further below. The use of AUR helpers (yaourt, pacaur, etc.) in particular is discouraged; it may or may not work for you.

    Also, unlike the official packages, which provide the latest stable releases, this one builds the code straight from the SVN source repository, where development is constantly taking place. Thus, it brings all the latest bells and whistles, but also tends to bring and all the latest bugs. It is therefore strongly recommended to use this LLVM/Clang build only for testing. Use in production should only be reserved for cases where you do need a particular feature (or a fix for some bug), which are not yet available in the stable releases.

    On failing regression tests

    Note that failing regression tests do not necessarily indicate a problem with the package. Such failures are fairly normal for an actively developed code (i.e. SVN trunk or Git master). If this happens, wait for some time before trying the build again: a few hours to a day or two at most should be enough. If you desperately need the package built right away, you may also comment out the make check and make check-clang lines or append || true to them, but do this only if you really know what you’re doing and why.

    Binary packages

    Pre-built, binary packages are available from two unofficial repositories:

    • lordheavy‘s mesa-git, which may be particularly useful for those who need LLVM solely as a Mesa dependency. Note that the packages are built against the [testing] repos. lordheavy is an Arch Linux developer and trusted user (TU).

    • kerberizer‘s llvm-svn, which is automatically rebuilt every 6 hours from this PKGBUILD and the latest SVN code. The packages are built against the [core/extra] repos. kerberizer is the current maintainer.

    Both repos provide x86_64 and multilib packages. kerberizer‘s repo is also PGP signed.

    Signature “unknown trust” error

    For PGP signed unofficial repositories to work correctly their signing key needs to be added to Pacman’s keyring. The process is described here. For the llvm-svn repo in particular, it boils down to:

    1. Fetch the necessary key from a keyserver:
    # pacman-key -r 0x76563F75679E4525
    
    1. Verify the key fingerprint; it must be exactly D16C F22D 27D1 091A 841C 4BE9 7656 3F75 679E 4525:
    $ pacman-key -f 0x76563F75679E4525
    
    1. If the fingerprint matches, sign the key locally:
    # pacman-key --lsign-key 0x76563F75679E4525
    

    If using LLVM as Mesa dependency

    You may find helpful the topic “mesa-git – latest videodrivers & issues” on the Arch Linux forums.

    Building in a clean chroot example

    If you need a more detailed and specific example on how to build this package in a clean chroot, a crude excerpt from the build script of the kerberizer‘s binary repo is presented here. You can also check the full script.

    It is meant to allow building lib32-llvm-svn too, hence why gcc-multilib is used. The code takes advantage of multiple cores when building and compressing; the example here is tailored to an 8-core/threads system. The user’s ccache cache is utilised as well, so frequent rebuilds can be much faster. If you don’t sign your packages, omit the lines mentioning PACKAGER and GPGKEY, otherwise they need to be set correctly. The chroot (${x86_64_chroot}) is best set up in /tmp, but this requires a lot of RAM (most likely at least 32 GB, since /tmp is by default half the size of the physical RAM detected); second best solution is on an SSD. The latter goes for ~/.ccache as well. Note that the latest versions of systemd mount /tmp with the nosuid flag. You need to turn this flag off before building on /tmp, or else the build will fail.

    cd /path/to/where/llvm-svn/is/cloned
    
    x86_64_chroot="/chroot/x86_64"
    
    sudo mkdir -p "${x86_64_chroot}/root"
    
    sudo /usr/bin/mkarchroot \
        -C /usr/share/devtools/pacman-multilib.conf \
        -M /usr/share/devtools/makepkg-x86_64.conf \
        -c /var/cache/pacman/pkg \
        "${x86_64_chroot}/root" \
        base-devel ccache
    
    sudo /usr/bin/arch-nspawn "${x86_64_chroot}/root" /bin/bash -c "yes | pacman -Sy gcc-multilib"
    
    sudo /usr/bin/arch-nspawn "${x86_64_chroot}/root" /bin/bash -c \
        "echo -e \"CCACHE_DIR='/.ccache'\nXZ_DEFAULTS='--threads=8'\" >>/etc/environment ; \
         sed \
            -e 's/^#MAKEFLAGS=.*$/MAKEFLAGS=\"-j9\"/' \
            -e '/^BUILDENV=/s/\!ccache/ccache/' \
            -e 's/^#PACKAGER=.*$/PACKAGER=\"Some One <someone@somewhere.com>\"/' \
            -e 's/^#GPGKEY=.*$/GPGKEY=\"0x0000000000000000\"/' \
            -i /etc/makepkg.conf"
    
    sudo /usr/bin/makechrootpkg -c -d ~/.ccache:/.ccache -r "${x86_64_chroot}"

    It’s advisable to always start this from scratch, i.e. don’t reuse the old chroot, but create it anew for each build (it uses the local pacman cache, so doesn’t waste bandwidth, and if located in /tmp or on an SSD, is pretty fast).

    Bugs

    • When an older or generally different version of llvm-ocaml{,-svn} is installed on the build system, the build would likely fail with inconsistent assumptions over interface errors. The PKGBUILD will detect such situation and spit out an appropriate suggestion: namely, to either uninstall any currently installed llvm-ocaml* package before building, or, preferably, to build in a clean chroot, as described on the Arch Linux wiki.

    Visit original content creator repository
    https://github.com/arch-llvm/llvm-svn

  • hugo-theme-yuminos

    Yuminos

    license last release last commit commit activity

    Yuminos – минималистичная и функциональная тема для генератора статических сайтов Hugo.

    Основана на теме Minos и дизайне сайта Дмитрия Ковалёва.

    Демонстрация темы: https://yu-leo.github.io/yu0dev/

    ❗Дисклеймер

    1. Проект находится в стадии разработки. Может содержать ошибки и недочеты как в UI/UX, так и в реализации задуманного: “костыли”, не оптимальные решения, дублирование кода, некрасивый код и т. д. и т. п. Issues с замечаниями и предложениями, а так же Pull Requests с исправлениями приветствуются!
    2. Корректное отображение и функционирование table of content при включении данной опции в конфиге не гарантируется!

    🗿 Философия темы

    • Минималистичность дизайна
    • Контент первичен. Оформление темы не должно мешать его восприятию
    • Широкие возможности для авторов контента важны

    🖼 Скриншоты

    Главная страница

    screenshot.png

    Страница тега

    tag.png

    Страница статьи (начало)

    article.png

    Страница статьи (конец) article-end.png

    🔨 Установка

    Для того чтобы установить тему Yuminos:

    1. Склонируйте этот репозиторий в директорию themes/ Вашего сайта:
    git clone https://github.com/Yu-Leo/hugo-theme-yuminos

    либо добавьте его как подмодуль, если в директории с Вашим сайтом инициализирован git-репозиторий:

    git submodule add https://github.com/Yu-Leo/hugo-theme-yuminos
    1. Укажите название темы в конфигурационном файле. По умолчанию – в файле hugo.toml в директории Вашего сайта:
    theme = "hugo-theme-yuminos"

    ⬆ Обновление

    Если тема была установлена как git-подмодуль, обновить её можно следующим образом:

    git submodule update --remote themes/hugo-theme-yuminos

    ⭐ Возможности

    Пагинация

    Используется на страницах, содержащих списки постов: главная страница, страницы тегов и категорий.

    paginate = 50

    KaTeX

    В теме присутствует поддержка отображения TeX вёрстки при помощи KaTeX. Включить либо отключить рендеринг можно в соответствующем параметре в конфиге:

    [params]  
      katex = true
    Скриншот

    latex.png

    • Inline верстка должна обрамляться последовательностями \\( и \\).
    • Отдельные блоки, выравниваемые по центру, – последовательностями $$
    • Дополнение copy-tex заменяет отрендеренные фрагменты на исходную TeX-верстку при выделении и копировании
    • Поддерживаемые операции: https://katex.org/docs/supported.html
    • Простой TeX редактор: https://latexeditor.lagrida.com/

    Блоки кода

    Все блоки кода содержат кнопку “копировать”, по нажатию на которую содержимое соответствующего блока копируется в буфер обмена. Вне зависимости от того, оформлены блоки кода в разметке Markdown или добавлены при помощи Hugo shortcodes.

    ❗Баг в текущей реализации: при включении нумерации строк ({lineNos=true}) номера строк так же копируются в буффер обмена.

    Тема Yuminos подразумевает использование цветовой схемы gruvbox для блоков кода. Цвета кнопки копирования взяты из её палитры. Тема содержит встроенные стили для блоков кода (highlight-style.css), основанные на теме gruvbox. Размер табуляции равен 4 пробелам.

    Рекомендую установить следующие настройки в конфигурационном файле:

    [markup]
      defaultMarkdownHandler = 'goldmark'
      [markup.goldmark]
        [markup.goldmark.renderer]
          unsafe = true
        [markup.goldmark.extensions]
          highlight = true
      [markup.highlight]
        lineNumbersInTable=false
        noClasses=false
    Скриншот

    codeblock.png

    Shell

    Если в качестве языка для блока с кодом указан shell, то к каждой строке такого блока будет добавлен символ “$”. Он не будет выделяться курсором вместе с остальным текстом и не будет копироваться в буфер обмена при нажатии кнопки копирования. Эту фичу можно использовать для оформления запускаемых из терминала команд.

    Скриншот

    codeblock-shell.png

    Diff

    Встроенные стили для блоков кода (highlight-style.css) имеют кастомное оформление для языка diff:

    Исходный код (.md)
    diff --git a/.signer2.go b/.signer2.go
    var hello = function() {
    -  return "hello";
    +  return "hello world";
    }
    
    !strong text
    text
    @subheading
    Index asdfasdf
    = asfdasfasfd
    
    Скриншот

    codeblock-diff.png

    Highlight shortcode

    Документация. Справка

    ❗ Опция lineNos=table имеет некорректное отображение. Рекомендую использовать lineNos=inline

    Title

    Можно задать название для блока кода. Для этого нужно указать его после названия языка: rust {title="main.rs"}

    Исходный код (.md)

    codeblock-title-md.png

    Скриншот

    codeblock-title.png

    Мета-теги

    Для улучшения SEO шаблоны темы содержат мета-теги. Значения тегов title, description и keywords берутся из параметров поста. При отсутствии в параметрах поста – из конфигурационного файла сайта.

    Для всего сайта

    Значения задаются в конфигурационном файле:

    [params]
      description = "Site description"
      keywords = ["keyword1", "keyword2"]
      [params.author]
        name = "Author name"

    Для конкретного поста

    Значения задаются в параметрах поста:

    ---
    title: "Тестовая страница"
    description: "Это тестовая страница, демонстрирующая возможности темы"
    keywords: ["keyword1", "keyword2"]
    ---
    

    Open Graph

    Присутствует поддержка мета-тегов Open Graph: og:title, og:description, og:type, og:url.

    Комментарии. Giscus

    Присутствует интеграция с системой комментариев giscus.

    Настройки в конфигурационном файле:

    [params]
      [params.comments]
        enabled = true
      [params.comments.giscus]
          repo = "repo-name"
          repoID = "repo-id"
          category = "category-name"
          categoryID = "category-id"
          mapping = "title"
          reactionsEnabled = 1
          emitMetadata = 0
          lazy = false
          lang = "en"

    Для каждого поста можно отдельно отключить комментарии в его параметрах:

    ---
    comments: false
    ---
    

    Яндекс.Метрика

    Присутствует интеграция с сервисом Яндекс.Метрика.

    Настройки в конфигурационном файле:

    [params]
      yandexMetrikaId = "1234567890"

    Alerts

    К каждому посту можно добавить алёрт, который будет отображаться перед его содержимым.

    Для этого нужно указать в параметрах поста следующие строки:

    ---
    page:
      alert:
        message: "Содержимое алёрта. Можно использовать **Markdown**"
        type: "danger"
    ---

    Типы алёртов:

    • info (синий)
    • success (зелёный)
    • danger (красный)

    Если Вам нужен информационный алёрт, можно использовать сокращённую форму:

    ---
    page:
      alert: "Информационный алерт"
    ---
    Скриншоты

    info-alert.png

    success-alert.png

    danger-alert.png

    Блоки ToDo

    Полезны, если в процессе написания поста Вы хотите оставить какие-либо заметки на будущее и не забыть удалить их перед публикацией.

    Все ToDo-блоки, содержащиеся в посте, автоматически будут подсчитаны. В начале поста будет отображаться алёрт с их количеством, если оно больше 0.

    Блок с содержимым

    Добавляется в пост следующим образом:

    {{< todo >}}
    Содержимое блока ToDo. Можно использовать **Markdown**
    {{< /todo >}}

    Блок без содержимого

    Добавляется в пост следующим образом:

    {{< td >}}
    Скриншоты

    todo-block.png

    todo-alert.png

    Скрытые блоки

    Синтаксис:

    Исходный код
    <details>
    <summary>Подробнее</summary>
    
    ## Скрытый блок
    
    Lorem ipsum dolor sit amet, officia excepteur ex fugiat reprehenderit enim labore culpa sint ad nisi Lorem pariatur mollit ex esse exercitation amet. Nisi anim cupidatat excepteur officia. Reprehenderit nostrud nostrud ipsum Lorem est aliquip amet voluptate voluptate dolor minim nulla est proident. Nostrud officia pariatur ut officia. Sit irure elit esse ea nulla sunt ex occaecat reprehenderit commodo officia dolor Lorem duis laboris cupidatat officia voluptate. Culpa proident adipisicing id nulla nisi laboris ex in Lorem sunt duis officia eiusmod. Aliqua reprehenderit commodo ex non excepteur duis sunt velit enim. Voluptate laboris sint cupidatat ullamco ut ea consectetur et est culpa et culpa duis.
    
    > Цитата
    </details>
    Скриншот (блок скрыт)

    details-close.png

    Скриншот (блок открыт)

    details-open.png

    Goat

    Присутствует поддержка Goat.

    Исходный код
          .               .                .               .--- 1          .-- 1     / 1
         / \              |                |           .---+            .-+         +
        /   \         .---+---.         .--+--.        |   '--- 2      |   '-- 2   / \ 2
       +     +        |       |        |       |    ---+            ---+          +
      / \   / \     .-+-.   .-+-.     .+.     .+.      |   .--- 3      |   .-- 3   \ / 3
     /   \ /   \    |   |   |   |    |   |   |   |     '---+            '-+         +
     1   2 3   4    1   2   3   4    1   2   3   4         '--- 4          '-- 4     \ 4
    
    Скриншот

    details-close.png

    StartTime

    Если данная опция включена, в футере будет выводиться startTime – дата, с которой работает сайт.

    [params]
        startTime = "2023-08-24T10:00:00"
    Скриншот

    footer.png

    Thinkpad-like кнопки

    Если данная опция включена, обрамленные тегом <kbd>...</kbd> символы будут иметь стиль, схожий со стилем кнопок на клавиатурах ноутбуков Lenovo Thinkpad.

    [params]
      thinkpadKbd = true
    Скриншот

    thinkpad-btn-on.png

    Обычный вид кнопок (опция выключена):

    Скриншот

    thinkpad-btn-off.png

    Кастомное название сайта

    По умолчанию в левом углу хэдера сайта будет отображаться содержимое параметра title из конфигурационного файла.

    Если вы хотите использовать кастомное название сайта с собственными стилями, включите соответствующую настройку в конфигурационном файле:

    [params]
      customTitle = true

    в таком случае на место названия сайта будет подставлено содержимое файла layouts/partials/custom-title.html.

    🎨 UI

    Шрифты

    Основной текст: Lato

    Моноширинный текст: JetBrains Mono

    Цветовая палитра

    На данный момент тема содержит только светлое оформление, основанное на следующей цветовой палитре:

    • Белый: #ffffff – фоновый цвет
    • Черный: #000000 – основной цвет текста
    • Оттенки серого:
      • #939393 – иконки и названия тегов и категорий, иконки ссылки в заголовках в постах, текст в футере сайта
      • #f2f2f2 – фон для inline-кода
      • #495057 – фон для клавиш
      • #444444 – ссылки и заголовки постов в списках
    • Оранжевый: #F37E0C – основной контрастный цвет
    • Синий: #0C7C96 – алёрт типа info
    • Зелёный: #0AC20A – алёрт типа success
    • Красный: #E10B39 – алёрт типа danger
    • Фиолетовый: #5815A4 – ToDo блоки и алёрты

    Иконки

    В интерфейсе используются иконки из коллекции.

    📝 Лицензия

    Проект разрабатывается под лицензией MIT. Полный текст – в файле LICENSE.

    Visit original content creator repository https://github.com/Yu-Leo/hugo-theme-yuminos
  • notulensi-rapat-web-app

    Indonesia


    Aplikasi Notulensi Rapat

    Aplikasi Notulensi Rapat adalah aplikasi berbasis web yang dikembangkan menggunakan Laravel. Aplikasi ini bertujuan untuk membantu organisasi atau tim dalam mencatat, menyimpan, dan mengelola notulensi rapat secara efisien.


    Fitur Utama

    • Manajemen Rapat: Buat, perbarui, dan hapus data rapat.
    • Notulensi: Tambahkan catatan notulensi untuk setiap rapat.
    • Peserta Rapat: Kelola daftar peserta rapat.
    • Lampiran: Unggah dokumen atau file yang relevan dengan rapat.
    • Pencarian dan Filter: Cari dan filter rapat berdasarkan tanggal, topik, atau peserta.
    • Hak Akses: Sistem autentikasi dan otorisasi untuk admin dan pengguna biasa.

    Prasyarat

    Pastikan sistem Anda memiliki:

    1. PHP >= 8.1
    2. Composer >= 2.x
    3. Laravel >= 10.x
    4. Database MySQL
    5. Node.js >= 16.x dan npm/yarn
    6. Server lokal seperti XAMPP atau Laravel Sail

    Instalasi

    1. Clone Repository

      git clone git@github.com:ramdacodes/notulensi-rapat-web-app.git
      cd notulensi-rapat-web-app
    2. Install Dependensi

      composer install
    3. Konfigurasi File .env Salin file .env.example menjadi .env dan atur konfigurasi database:

      DB_CONNECTION=mysql
      DB_HOST=127.0.0.1
      DB_PORT=3306
      DB_DATABASE=nama_database
      DB_USERNAME=nama_user
      DB_PASSWORD=password
    4. Generate Key Aplikasi

      php artisan key:generate
    5. Migrasi Database Jalankan perintah berikut untuk membuat tabel di database:

      php artisan migrate
    6. Menjalankan Server Lokal Jalankan perintah berikut untuk menjalankan aplikasi:

      php artisan serve

      Akses aplikasi melalui browser di http://localhost:8000


    Penggunaan

    1. Login/Registrasi: Buat akun baru atau login dengan akun yang ada.
    2. Tambah Rapat: Masukkan detail rapat, seperti nama rapat, tanggal, dan waktu.
    3. Catat Notulensi: Tambahkan poin-poin penting dalam rapat.
    4. Unggah Lampiran: Sertakan file tambahan jika diperlukan.
    5. Kelola Peserta: Tambahkan atau hapus peserta rapat sesuai kebutuhan.

    Teknologi yang Digunakan

    • Laravel: Framework PHP untuk backend.
    • Filament: Untuk admin panel dan manajemen CRUD.
    • TailwindCSS: Untuk antarmuka pengguna.
    • MySQL: Database utama.
    • JavaScript/Alpine.js: Untuk komponen interaktif.

    Kontribusi

    Jika Anda ingin berkontribusi pada proyek ini:

    1. Fork repository ini.
    2. Buat branch fitur baru:
      git checkout -b fitur-baru
    3. Lakukan commit perubahan:
      git commit -m "Menambahkan fitur baru"
    4. Push ke branch Anda:
      git push origin fitur-baru
    5. Buat pull request ke repository utama.

    Lisensi

    Proyek ini dilisensikan di bawah MIT License.


    Kontak


    English


    Meeting Minutes Application

    The Meeting Minutes Application is a web-based application developed using Laravel. This application aims to assist organizations or teams in recording, storing, and managing meeting minutes efficiently.


    Key Features

    • Meeting Management: Create, update, and delete meeting records.
    • Minutes: Add meeting minutes for each meeting.
    • Participants: Manage the list of meeting participants.
    • Attachments: Upload documents or files relevant to the meeting.
    • Search and Filter: Search and filter meetings by date, topic, or participants.
    • Access Control: Authentication and authorization system for admins and regular users.

    Prerequisites

    Ensure your system has:

    1. PHP >= 8.1
    2. Composer >= 2.x
    3. Laravel >= 10.x
    4. Database MySQL
    5. Node.js >= 16.x and npm/yarn
    6. A local server such as XAMPP or Laravel Sail

    Installation

    1. Clone the Repository

      git clone git@github.com:ramdacodes/notulensi-rapat-web-app.git
      cd notulensi-rapat-web-app
    2. Install Dependencies

      composer install
    3. Configure .env File Copy the .env.example file to .env and set up the database configuration:

      DB_CONNECTION=mysql
      DB_HOST=127.0.0.1
      DB_PORT=3306
      DB_DATABASE=database_name
      DB_USERNAME=user_name
      DB_PASSWORD=password
    4. Generate Application Key

      php artisan key:generate
    5. Run Database Migrations Execute the following command to create tables in the database:

      php artisan migrate
    6. Run Local Server Start the application by running:

      php artisan serve

      Access the application via your browser at http://localhost:8000


    Usage

    1. Login/Register: Create a new account or log in with an existing one.
    2. Add Meetings: Enter meeting details such as name, date, and time.
    3. Record Minutes: Add key points discussed in the meeting.
    4. Upload Attachments: Include additional files if needed.
    5. Manage Participants: Add or remove participants as required.

    Technologies Used

    • Laravel: PHP framework for the backend.
    • Filament: For admin panel and CRUD management.
    • TailwindCSS: For the user interface.
    • MySQL: Primary database.
    • JavaScript/Alpine.js: For interactive components.

    Contribution

    If you would like to contribute to this project:

    1. Fork this repository.
    2. Create a new feature branch:
      git checkout -b new-feature
    3. Commit your changes:
      git commit -m "Add new feature"
    4. Push to your branch:
      git push origin new-feature
    5. Create a pull request to the main repository.

    License

    This project is licensed under the MIT License.


    Visit original content creator repository https://github.com/ramdacodes/notulensi-rapat-web-app
  • WhisUp3

    WhisUp3 – Anonymous, Encrypted, Censorship Resistant Decentralised Feedbacks on Web3

    • Send / Receive Anonymous feedback messages over Public Wallet Addresses
    • Encrypt message using receiver’s public key before sending which can be decrypted by receiver using his private key

    Used Waku Protocol

    React + TS

    MetaMask for message encryption

    Getting Started with Create React App

    This project was bootstrapped with Create React App.

    Available Scripts

    In the project directory, you can run:

    npm start

    Runs the app in the development mode.
    Open http://localhost:3000 to view it in the browser.

    The page will reload if you make edits.
    You will also see any lint errors in the console.

    npm test

    Launches the test runner in the interactive watch mode.
    See the section about running tests for more information.

    npm run build

    Builds the app for production to the build folder.
    It correctly bundles React in production mode and optimizes the build for the best performance.

    The build is minified and the filenames include the hashes.
    Your app is ready to be deployed!

    See the section about deployment for more information.

    npm run eject

    Note: this is a one-way operation. Once you eject, you can’t go back!

    If you aren’t satisfied with the build tool and configuration choices, you can eject at any time. This command will remove the single build dependency from your project.

    Instead, it will copy all the configuration files and the transitive dependencies (webpack, Babel, ESLint, etc) right into your project so you have full control over them. All of the commands except eject will still work, but they will point to the copied scripts so you can tweak them. At this point you’re on your own.

    You don’t have to ever use eject. The curated feature set is suitable for small and middle deployments, and you shouldn’t feel obligated to use this feature. However we understand that this tool wouldn’t be useful if you couldn’t customize it when you are ready for it.

    Learn More

    You can learn more in the Create React App documentation.

    To learn React, check out the React documentation.

    Visit original content creator repository
    https://github.com/sudiptab2100/WhisUp3

  • DNA-Sequencing

    Note : All the Rendered Juypter Notebooks(in nbviewer) for better view are availabe by clicking on the links embedded below. Also some links might not work so you can direcly click here and paste the link of the notebook you want to render

    DNA Sequencing is the process of determining the nucleic acid sequence – the order of nucleotides in DNA. It includes any method or technology that is used to determine the order of the four bases: Adenine(A), Guanine(G), Cytosine(C), and Thymine(T). DNA Sequencing may be used to determine the sequence of individual genes, larger genetic regions (i.e. clusters of genes or operons), full chromosomes, or entire genomes of any organism. DNA sequencing is also the most efficient way to indirectly sequence RNA or proteins.

    N|Solid

    Read Alignment Algorithms Covered :

    • Online Algorithms:

      The algorithm in which the text ‘T’ (in our case the reference genome) is not pre-processed, and it doesn’t matter if the pattern ‘P’ is pre-processed or not.

    • Offline Algorithms:

      The algorithm in which the text ‘T’ is pre-processed, and it doesn’t matter if the pattern ‘P’ is pre-processed or not.

      We use the term k-mer to refer to a substring of length k. For each offset that the index reports back, that’s called an index hit. When P matches within T, we’ve been calling that a match, or an occurrence. But, an index hit may or may not correspond to a match, it’s just a hint that we should look harder in that particular region of T. So, not all index hits lead to matches, because we don’t know whether the rest of P matches where it should within T. We have to do more character comparisons. And, this additional work that we do is called verification.

      This kind of data structure is called a multimap. It’s a map because it associates keys, k-mers, in this case with values, offsets in the genome. And it’s a multimap because a k-mer may be associated with many different offsets in the genome.

      In mathematics, a subsequence is a sequence that can be derived from another sequence by deleting some or no elements without changing the order of the remaining elements.

    Need for Approximate Matching Algorithms :

    • We need algorithms that can do approximate matching. Allowing for differences between the pattern and the text. One of the reason we might expect differences between the read and the reference is because of sequencing errors. Sometimes the sequencer will make mistakes. It will miscall a base in the sequencing read. And when that happens, that base might no longer match the reference genome.

    • We want to be able to talk about the distance between two strings. In other words, we want to be able to describe how different they are, how many differences there are. But we have to define exactly what we mean by distance.

      • So the first kind of distance we’ll define is called Hamming Distance. So if you have two strings, X & Y, that are of the same length, we can define the hamming distance between X and Y as the minimal number of substitutions we need to make to turn one of the strings into the other.

      • Another is Edit Distance(AKA levenshtein Distance) between two strings equals the minimal number of edits required to turn one string into the other. Where a single edit could be a substitution, or it could be an insertion or a deletion. (In this case X & Y could be of different length)

      • Approximate Matching Algorithm using Pigeonhole Principle (and Boyer Moore) : The Pigeonhole Principle states that if items are put into containers, with, then at least one container must contain more than one item. In our case we will split pattern ‘P’ (k+1) times when we are looking for an approximate match of upto ‘k’ mismatches, that means even if we have ‘k’ mismatches in ‘k’ partitions of pattern ‘P’, still there will be atleast one partition which will exactly match with the reference genome, which we can later confirm by verification as stated in indexing techiques.

      • Global Alignment: Calculating a global alignment is a form of global optimization that “forces” the alignment to span the entire length of all query sequences. By contrast, local alignments identify regions of similarity within long sequences that are often widely divergent overall. An attempt is made to align the entire sequence (end to end alignment) Finds local regions with the highest level of similarity between the two sequences. A global alignment contains all letters from both the query and target sequences. It penalises the Substitution/ Insertion/ Deletion differently than editDistance.

      • Overlaps: Overlap–layout–consensus genome assembly algorithm: Reads are provided to the algorithm. Overlapping regions are identified. Each read is graphed as a node and the overlaps are represented as edges joining the two nodes involved. The algorithm determines the best path through the graph (Hamiltonian path).

      • Shortest Common Superstring: A shortest common supersequence (SCS) is a common supersequence of minimal length. In the shortest common supersequence problem, two sequences X and Y are given, and the task is to find a shortest possible common supersequence of these sequences.

    Visit original content creator repository https://github.com/visheshsinha/DNA-Sequencing
  • aws-appsync-react-workshop

    Building real-time applications with React, GraphQL & AWS AppSync

    In this workshop we’ll learn how to build cloud-enabled web applications with React, AppSync, GraphQL, & AWS Amplify.

    Topics we’ll be covering:

    Redeeming the AWS Credit

    1. Visit the AWS Console.
    2. In the top right corner, click on My Account.
    3. In the left menu, click Credits.

    Getting Started – Creating the React Application

    To get started, we first need to create a new React project using the Create React App CLI.

    $ npx create-react-app my-amplify-app

    Now change into the new app directory & install the AWS Amplify, AWS Amplify React, & uuid libraries:

    $ cd my-amplify-app
    $ npm install --save aws-amplify aws-amplify-react uuid
    # or
    $ yarn add aws-amplify aws-amplify-react uuid

    Installing the CLI & Initializing a new AWS Amplify Project

    Installing the CLI

    Next, we’ll install the AWS Amplify CLI:

    $ npm install -g @aws-amplify/cli

    Now we need to configure the CLI with our credentials:

    $ amplify configure

    If you’d like to see a video walkthrough of this configuration process, click here.

    Here we’ll walk through the amplify configure setup. Once you’ve signed in to the AWS console, continue:

    • Specify the AWS Region: us-east-1 || us-west-2 || eu-central-1
    • Specify the username of the new IAM user: amplify-workshop-user

    In the AWS Console, click Next: Permissions, Next: Tags, Next: Review, & Create User to create the new IAM user. Then, return to the command line & press Enter.

    • Enter the access key of the newly created user:
      ? accessKeyId: (<YOUR_ACCESS_KEY_ID>)
      ? secretAccessKey: (<YOUR_SECRET_ACCESS_KEY>)
    • Profile Name: amplify-workshop-user

    Initializing A New Project

    $ amplify init
    • Enter a name for the project: amplifyreactapp
    • Enter a name for the environment: dev
    • Choose your default editor: Visual Studio Code (or your default editor)
    • Please choose the type of app that you’re building javascript
    • What javascript framework are you using react
    • Source Directory Path: src
    • Distribution Directory Path: build
    • Build Command: npm run-script build
    • Start Command: npm run-script start
    • Do you want to use an AWS profile? Y
    • Please choose the profile you want to use: amplify-workshop-user

    Now, the AWS Amplify CLI has iniatilized a new project & you will see a new folder: amplify & a new file called aws-exports.js in the src directory. These files hold your project configuration.

    To view the status of the amplify project at any time, you can run the Amplify status command:

    $ amplify status

    Configuring the React applicaion

    Now, our resources are created & we can start using them!

    The first thing we need to do is to configure our React application to be aware of our new AWS Amplify project. We can do this by referencing the auto-generated aws-exports.js file that is now in our src folder.

    To configure the app, open src/index.js and add the following code below the last import:

    import Amplify from 'aws-amplify'
    import config from './aws-exports'
    Amplify.configure(config)

    Now, our app is ready to start using our AWS services.

    Adding a GraphQL API

    To add a GraphQL API, we can use the following command:

    $ amplify add api
    
    ? Please select from one of the above mentioned services: GraphQL
    ? Provide API name: ConferenceAPI
    ? Choose an authorization type for the API: API key
    ? Enter a description for the API key: <some description>
    ? After how many days from now the API key should expire (1-365): 365
    ? Do you want to configure advanced settings for the GraphQL API: No
    ? Do you have an annotated GraphQL schema? N 
    ? Do you want a guided schema creation? Y
    ? What best describes your project: Single object with fields
    ? Do you want to edit the schema now? (Y/n) Y

    When prompted, update the schema to the following:

    # amplify/backend/api/ConferenceAPI/schema.graphql
    
    type Talk @model {
      id: ID!
      clientId: ID
      name: String!
      description: String!
      speakerName: String!
      speakerBio: String!
    }

    Local mocking and testing

    To mock and test the API locally, you can run the mock command:

    $ amplify mock api
    
    ? Choose the code generation language target: javascript
    ? Enter the file name pattern of graphql queries, mutations and subscriptions: src/graphql/**/*.js
    ? Do you want to generate/update all possible GraphQL operations - queries, mutations and subscriptions: Y
    ? Enter maximum statement depth [increase from default if your schema is deeply nested]: 2

    This should start an AppSync Mock endpoint:

    AppSync Mock endpoint is running at http://10.219.99.136:20002

    Open the endpoint in the browser to use the GraphiQL Editor.

    From here, we can now test the API.

    Performing mutations from within the local testing environment

    Execute the following mutation to create a new talk in the API:

    mutation createTalk {
      createTalk(input: {
        name: "Full Stack React"
        description: "Using React to build Full Stack Apps with GraphQL"
        speakerName: "Jennifer"
        speakerBio: "Software Engineer"
      }) {
        id name description speakerName speakerBio
      }
    }

    Now, let’s query for the talks:

    query listTalks {
      listTalks {
        items {
          id
          name
          description
          speakerName
          speakerBio
        }
      }
    }

    We can even add search / filter capabilities when querying:

    query listTalksWithFilter {
      listTalks(filter: {
        description: {
          contains: "React"
        }
      }) {
        items {
          id
          name
          description
          speakerName
          speakerBio
        }
      }
    }

    Interacting with the GraphQL API from our client application – Querying for data

    Now that the GraphQL API server is running we can begin interacting with it!

    The first thing we’ll do is perform a query to fetch data from our API.

    To do so, we need to define the query, execute the query, store the data in our state, then list the items in our UI.

    src/App.js

    // src/App.js
    import React from 'react';
    
    // imports from Amplify library
    import { API, graphqlOperation } from 'aws-amplify'
    
    // import query definition
    import { listTalks as ListTalks } from './graphql/queries'
    
    class App extends React.Component {
      // define some state to hold the data returned from the API
      state = {
        talks: []
      }
    
      // execute the query in componentDidMount
      async componentDidMount() {
        try {
          const talkData = await API.graphql(graphqlOperation(ListTalks))
          console.log('talkData:', talkData)
          this.setState({
            talks: talkData.data.listTalks.items
          })
        } catch (err) {
          console.log('error fetching talks...', err)
        }
      }
      render() {
        return (
          <>
            {
              this.state.talks.map((talk, index) => (
                <div key={index}>
                  <h3>{talk.speakerName}</h3>
                  <h5>{talk.name}</h5>
                  <p>{talk.description}</p>
                </div>
              ))
            }
          </>
        )
      }
    }
    
    export default App

    In the above code we are using API.graphql to call the GraphQL API, and then taking the result from that API call and storing the data in our state. This should be the list of talks you created via the GraphiQL editor.

    Feel free to add some styling here to your list if you’d like 😀

    Next, test the app locally:

    $ npm start

    Performing mutations

    Now, let’s look at how we can create mutations.

    To do so, we’ll refactor our initial state in order to also hold our form fields and add an event handler.

    We’ll also be using the API class from amplify again, but now will be passing a second argument to graphqlOperation in order to pass in variables: API.graphql(graphqlOperation(CreateTalk, { input: talk })).

    We also have state to work with the form inputs, for name, description, speakerName, and speakerBio.

    // src/App.js
    import React from 'react';
    
    import { API, graphqlOperation } from 'aws-amplify'
    // import uuid to create a unique client ID
    import uuid from 'uuid/v4'
    
    import { listTalks as ListTalks } from './graphql/queries'
    // import the mutation
    import { createTalk as CreateTalk } from './graphql/mutations'
    
    const CLIENT_ID = uuid()
    
    class App extends React.Component {
      // define some state to hold the data returned from the API
      state = {
        name: '', description: '', speakerName: '', speakerBio: '', talks: []
      }
    
      // execute the query in componentDidMount
      async componentDidMount() {
        try {
          const talkData = await API.graphql(graphqlOperation(ListTalks))
          console.log('talkData:', talkData)
          this.setState({
            talks: talkData.data.listTalks.items
          })
        } catch (err) {
          console.log('error fetching talks...', err)
        }
      }
      createTalk = async() => {
        const { name, description, speakerBio, speakerName } = this.state
        if (name === '' || description === '' || speakerBio === '' || speakerName === '') return
    
        const talk = { name, description, speakerBio, speakerName, clientId: CLIENT_ID }
        const talks = [...this.state.talks, talk]
        this.setState({
          talks, name: '', description: '', speakerName: '', speakerBio: ''
        })
    
        try {
          await API.graphql(graphqlOperation(CreateTalk, { input: talk }))
          console.log('item created!')
        } catch (err) {
          console.log('error creating talk...', err)
        }
      }
      onChange = (event) => {
        this.setState({
          [event.target.name]: event.target.value
        })
      }
      render() {
        return (
          <>
            <input
              name='name'
              onChange={this.onChange}
              value={this.state.name}
              placeholder='name'
            />
            <input
              name='description'
              onChange={this.onChange}
              value={this.state.description}
              placeholder='description'
            />
            <input
              name='speakerName'
              onChange={this.onChange}
              value={this.state.speakerName}
              placeholder='speakerName'
            />
            <input
              name='speakerBio'
              onChange={this.onChange}
              value={this.state.speakerBio}
              placeholder='speakerBio'
            />
            <button onClick={this.createTalk}>Create Talk</button>
            {
              this.state.talks.map((talk, index) => (
                <div key={index}>
                  <h3>{talk.speakerName}</h3>
                  <h5>{talk.name}</h5>
                  <p>{talk.description}</p>
                </div>
              ))
            }
          </>
        )
      }
    }
    
    export default App

    Adding Authentication

    Next, let’s update the app to add authentication.

    To add authentication, we can use the following command:

    $ amplify add auth
    
    ? Do you want to use default authentication and security configuration? Default configuration 
    ? How do you want users to be able to sign in when using your Cognito User Pool? Username
    ? Do you want to configure advanced settings? No, I am done.   

    Using the withAuthenticator component

    To add authentication in the React app, we’ll go into src/App.js and first import the withAuthenticator HOC (Higher Order Component) from aws-amplify-react:

    // src/App.js, import the new component
    import { withAuthenticator } from 'aws-amplify-react'

    Next, we’ll wrap our default export (the App component) with the withAuthenticator HOC:

    // src/App.js, change the default export to this:
    export default withAuthenticator(App, { includeGreetings: true })

    To deploy the authentication service and mock and test the app locally, you can run the mock command:

    $ amplify mock
    
    ? Are you sure you want to continue? Yes

    Next, to test it out in the browser:

    npm start

    Now, we can run the app and see that an Authentication flow has been added in front of our App component. This flow gives users the ability to sign up & sign in.

    Accessing User Data

    We can access the user’s info now that they are signed in by calling Auth.currentAuthenticatedUser() in componentDidMount.

    import {API, graphqlOperation, /* new 👉 */ Auth} from 'aws-amplify'
    
    async componentDidMount() {
      // add this code to componentDidMount
      const user = await Auth.currentAuthenticatedUser()
      console.log('user:', user)
      console.log('user info:', user.signInUserSession.idToken.payload)
    }

    Adding Authorization to the GraphQL API

    Next we need to update the AppSync API to now use the newly created Cognito Authentication service as the authentication type.

    To do so, we’ll reconfigure the API:

    $ amplify update api
    
    ? Please select from one of the below mentioned services: GraphQL   
    ? Choose the default authorization type for the API: Amazon Cognito User Pool
    ? Do you want to configure advanced settings for the GraphQL API: No, I am done

    Next, we’ll test out the API with authentication enabled:

    $ amplify mock

    Now, we can only access the API with a logged in user.

    You’ll notice an auth button in the GraphiQL explorer that will allow you to update the simulated user and their groups.

    Fine Grained access control – Using the @auth directive

    GraphQL Type level authorization with the @auth directive

    For authorization rules, we can start using the @auth directive.

    What if you’d like to have a new Comment type that could only be updated or deleted by the creator of the Comment but can be read by anyone?

    We could add the following type to our GraphQL schema:

    # amplify/backend/api/ConferenceAPI/schema.graphql
    
    type Comment @model @auth(rules: [
      { allow: owner, ownerField: "createdBy", operations: [create, update, delete]},
      { allow: private, operations: [read] }
      ]) {
      id: ID!
      message: String
      createdBy: String
    }

    allow: owner – This allows us to set owner authorization rules.
    allow: private – This allows us to set private authorization rules.

    This would allow us to create comments that only the creator of the Comment could delete, but anyone could read.

    Creating a comment:

    mutation createComment {
      createComment(input:{
        message: "Cool talk"
      }) {
        id
        message
        createdBy
      }
    }

    Listing comments:

    query listComments {
      listComments {
        items {
          id
          message
          createdBy
        }
      }
    }

    Updating a comment:

    mutation updateComment {
      updateComment(input: {
        id: "59d202f8-bfc8-4629-b5c2-bdb8f121444a"
      }) {
        id 
        message
        createdBy
      }
    }

    If you try to update a comment from someone else, you will get an unauthorized error.

    Relationships

    What if we wanted to create a relationship between the Comment and the Talk? That’s pretty easy. We can use the @connection directive:

    # amplify/backend/api/ConferenceAPI/schema.graphql
    
    type Talk @model {
      id: ID!
      clientId: ID
      name: String!
      description: String!
      speakerName: String!
      speakerBio: String!
      comments: [Comment] @connection(name: "TalkComments")
    }
    
    type Comment @model @auth(rules: [
      { allow: owner, ownerField: "createdBy", operations: [create, update, delete]},
      { allow: private, operations: [read] }
      ]) {
      id: ID!
      message: String
      createdBy: String
      talk: Talk @connection(name: "TalkComments")
    }

    Because we’re updating the way our database is configured by adding relationships which requires a global secondary index, we need to delete the old local database:

    $ rm -r amplify/mock-data

    Now, restart the server:

    $ amplify mock

    Now, we can create relationships between talks and comments. Let’s test this out with the following operations:

    mutation createTalk {
      createTalk(input: {
        id: "test-id-talk-1"
        name: "Talk 1"
        description: "Cool talk"
        speakerBio: "Cool gal"
        speakerName: "Jennifer"
      }) {
        id
        name
        description
      }
    }
    
    mutation createComment {
      createComment(input: {
        commentTalkId: "test-id-talk-1"
        message: "Great talk"
      }) {
        id message
      }
    }
    
    query listTalks {
      listTalks {
        items {
          id
          name
          description
          comments {
            items {
              message
              createdBy
            }
          }
        }
      }
    }

    If you’d like to read more about the @auth directive, check out the documentation here.

    Groups

    The last problem we are facing is that anyone signed in can create a new talk. Let’s add authorization that only allows users that are in an Admin group to create and update talks.

    # amplify/backend/api/ConferenceAPI/schema.graphql
    
    type Talk @model @auth(rules: [
      { allow: groups, groups: ["Admin"] },
      { allow: private, operations: [read] }
      ]) {
      id: ID!
      clientId: ID
      name: String!
      description: String!
      speakerName: String!
      speakerBio: String!
      comments: [Comment] @connection(name: "TalkComments")
    }
    
    type Comment @model @auth(rules: [
      { allow: owner, ownerField: "createdBy", operations: [create, update, delete]},
      { allow: private, operations: [read] }
      ]) {
      id: ID!
      message: String
      createdBy: String
      talk: Talk @connection(name: "TalkComments")
    }

    Run the server:

    $ amplify mock

    Click on the auth button and add Admin the user’s groups.

    Now, you’ll notice that only users in the Admin group can create, update, or delete a talk, but anyone can read it.

    Lambda GraphQL Resolvers

    Next, let’s have a look at how to deploy a serverless function and use it as a GraphQL resolver.

    The use case we will work with is fetching data from another HTTP API and returning the response via GraphQL. To do this, we’ll use a serverless function.

    The API we will be working with is the CoinLore API that will allow us to query for cryptocurrency data.

    To get started, we’ll create the new function:

    $ amplify add function
    
    ? Provide a friendly name for your resource to be used as a label for this category in the project: currencyfunction
    ? Provide the AWS Lambda function name: currencyfunction
    ? Choose the function template that you want to use: Hello world function
    ? Do you want to access other resources created in this project from your Lambda function? N
    ? Do you want to edit the local lambda function now? Y

    Update the function with the following code:

    // amplify/backend/function/currencyfunction/src/index.js
    const axios = require('axios')
    
    exports.handler = function (event, _, callback) {
      let apiUrl = `https://api.coinlore.com/api/tickers/?start=1&limit=10`
    
      if (event.arguments) { 
        const { start = 0, limit = 10 } = event.arguments
        apiUrl = `https://api.coinlore.com/api/tickers/?start=${start}&limit=${limit}`
      }
    
      axios.get(apiUrl)
        .then(response => callback(null, response.data.data))
        .catch(err => callback(err))
    }

    In the above function we’ve used the axios library to call another API. In order to use axios, we need be sure that it will be installed by updating the package.json for the new function:

    amplify/backend/function/currencyfunction/src/package.json

    "dependencies": {
      // ...
      "axios": "^0.19.0",
    },

    Next, we’ll update the GraphQL schema to add a new type and query. In amplify/backend/api/ConferenceAPI/schema.graphql, update the schema with the following new types:

    type Coin {
      id: String!
      name: String!
      symbol: String!
      price_usd: String!
    }
    
    type Query {
      getCoins(limit: Int start: Int): [Coin] @function(name: "currencyfunction-${env}")
    }

    Now the schema has been updated and the Lambda function has been created. To test it out, you can run the mock command:

    $ amplify mock

    In the query editor, run the following queries:

    # basic request
    query listCoins {
      getCoins {
        price_usd
        name
        id
        symbol
      }
    }
    
    # request with arguments
    query listCoinsWithArgs {
      getCoins(limit:3 start: 10) {
        price_usd
        name
        id
        symbol
      }
    }

    This query should return an array of cryptocurrency information.

    Deploying the Services

    Next, let’s deploy the AppSync GraphQL API and the Lambda function:

    $ amplify push
    
    ? Do you want to generate code for your newly created GraphQL API? Y
    ? Choose the code generation language target: javascript
    ? Enter the file name pattern of graphql queries, mutations and subscriptions: src/graphql/**/*.js
    ? Do you want to generate/update all possible GraphQL operations - queries, mutations and subscriptions? Y
    ? Enter maximum statement depth [increase from default if your schema is deeply nested] 2

    To view the new AWS AppSync API at any time after its creation, run the following command:

    $ amplify console api

    To view the Cognito User Pool at any time after its creation, run the following command:

    $ amplify console auth

    To test an authenticated API out in the AWS AppSync console, it will ask for you to Login with User Pools. The form will ask you for a ClientId. This ClientId is located in src/aws-exports.js in the aws_user_pools_web_client_id field.

    Hosting via the Amplify Console

    The Amplify Console is a hosting service with continuous integration and continuous deployment.

    The first thing we need to do is create a new GitHub repo for this project. Once we’ve created the repo, we’ll copy the URL for the project to the clipboard & initialize git in our local project:

    $ git init
    
    $ git remote add origin git@github.com:username/project-name.git
    
    $ git add .
    
    $ git commit -m 'initial commit'
    
    $ git push origin master

    Next we’ll visit the Amplify Console in our AWS account at https://us-east-1.console.aws.amazon.com/amplify/home.

    Here, we’ll click on the app that we deployed earlier.

    Next, under “Frontend environments”, authorize Github as the repository service.

    Next, we’ll choose the new repository & branch for the project we just created & click Next.

    In the next screen, we’ll create a new role & use this role to allow the Amplify Console to deploy these resources & click Next.

    Finally, we can click Save and Deploy to deploy our application!

    Now, we can push updates to Master to update our application.

    Amplify DataStore

    To implement a GraphQL API with Amplify DataStore, check out the tutorial here

    Removing Services

    If at any time, or at the end of this workshop, you would like to delete a service from your project & your account, you can do this by running the amplify remove command:

    $ amplify remove auth
    
    $ amplify push

    If you are unsure of what services you have enabled at any time, you can run the amplify status command:

    $ amplify status

    amplify status will give you the list of resources that are currently enabled in your app.

    If you’d like to delete the entire project, you can run the delete command:

    $ amplify delete
    Visit original content creator repository https://github.com/dabit3/aws-appsync-react-workshop
  • AutoDailyReport-For-USTC

    USTC健康打卡平台自动打卡脚本

    Auto-report action Language GitHub stars GitHub forks

    说明

    本打卡脚本仅供学习交流使用,请勿过分依赖。开发者对使用或不使用本脚本造成的问题不负任何责任,不对脚本执行效果做出任何担保,原则上不提供任何形式的技术支持。

    本仓库基于原版,参考修改版并进行修改,增加对出校申请和跨校区报备的支持。目前正持续更新以尽量使得每一天都可以自动打卡,愿完全放开的日子早日到来。

    更新记录

    • 20220407: 本人基于之前的脚本,并进行修改以适应现在的打卡版本
    • 20220408: 在SECRET中增加是否执行操作的选项,以适应更多需求
    • 20220421: 增加每日上传两码功能
    • 20220506: 恭喜解封,源代码可用,但增加每日出校报备
    • 20220509: 解决打卡系统post链接被修改,上传两码需要GID的问题
    • 20220510: 解决上传两码需要sign的问题
    • 20220513: 恭喜自动授权安康码,不再需要自动上传安康码
    • 20220706: 增加对于不在校等状态的支持,可能有bug
    • 20220829: 风头较严,进出校需要人工审核,建议只进行报备和上传行程码
    • 20220830: 增加每日对于申请审核跨校区的支持
    • 20220909: 再次恭喜解封,并启用原功能
    • 20221007: 完善进出校申请和报备的切换,以及行程码上传方法
    • 20221018: 出校报备需要两次核酸报告,需要手动上传
    • 20221022: 现在申请也过不了,傻逼封控,暂停申请
    • 20221107: 再次恭喜解封,并启用原功能
    • 20221128: 根据新要求,只能在20点之后报备下一天,更改报备时间
    • 20230226: 恭喜全面解封,感谢大家支持,脚本停止运行,愿它永不启用

    使用方法

    写在前面:请在自己fork的仓库中修改,并push到自己的仓库,不要直接修改本仓库,也不要将您的修改pull request到本仓库(对本仓库的改进除外)!如果尚不了解github的基本使用方法,请参阅使用议题和拉取请求进行协作/使用复刻使用议题和拉取请求进行协作/通过拉取请求提议工作更改

    可根据使用视频: Bilibili进行使用。或者可以按照如下步骤操作:

    1. 将本代码仓库fork到自己的github,并授权打卡系统从权威机构获取安康码信息。

    2. 根据自己的实际情况修改runme.py中的前40行数据。

    3. 将修改好的代码提交到自己的仓库。

    4. 点击Actions选项卡,点击I understand my workflows, go ahead and enable them.

    5. 点击Settings选项卡,点击左侧Secrets,点击New secret,创建名为STUID,值为自己学号的secret。用同样方法,创建名为PASSWORD,值为自己统一身份认证密码的secret。以上数据不会被公开。

      secrets

    6. 默认的打卡时间是每天的上午7:10(建议5点之后,因为5点才会同步安康码),可能会有(延后)几十分钟的浮动。如需选择其它时间,可以修改.github/workflows/report.yml中的cron,详细说明参见安排的事件,请注意这里使用的是国际标准时间UTC,北京时间的数值比它大8个小时。建议修改默认时间,避开打卡高峰期以提高成功率。

    7. 在Actions选项卡可以确认打卡情况。如果打卡失败(可能是临时网络问题等原因),脚本会自动重试,五次尝试后如果依然失败,将返回非零值提示构建失败。

    8. 在Github个人设置页面的Notifications下可以设置Github Actions的通知,建议打开Email通知,并勾选”Send notifications for failed workflows only”。请及时查看邮件,如果失败会进行通知。

    9. 如果觉得这个仓库对你有用的话,给个星星✨吧~

    在本地运行测试

    要在本地运行测试,需要安装python 3。我们假设您已经安装了python 3和pip 3,并已将其路径添加到环境变量。

    安装依赖

    pip install -r requirements.txt

    运行打卡程序

    python runme.py [STUID] [PASSWORD]

    其中,[STUID]是学号,[PASSWORD]是统一身份认证的密码明文,剩下三个参数为是否出校报备、是否跨校区报备、是否每日打卡,默认不出校,跨校区,打卡。如

    python runme.py "PB19890604" "FREEDOM"
    Visit original content creator repository https://github.com/cyzkrau/AutoDailyReport-For-USTC