A Simple Software Application for transferring files from phone to pc. This is done by starting a server on your android device using the application called [SimpleHttpServer](https://play.google.com/store/apps/details?id=jp.ubi.common.http.server). The IP/URL displayed after starting the server is required to be entered to be connected. Once connected android device files and folder can be explored and downloaded.
The application allows multiple files located in different folder to be downloaded simultaneously. It also provides a minimal and interactive user interface.
Warning
The application is still in development stage some unwanted bugs might occur. Feel free to raise issues on this github page.
Build as static library using cmake with release config
cmake --build build --config Releasecmake --install . --config Release
copy the lib and include directory from the install location into packages/cpr
GLFW
Build as static library using cmake with release config and copy include and lib dir to packages/glfw
ImGui LunaSVG spdlog
Just clone the repository and the respective folder and that’s it.
Note
Place all the required imgui files from the repository along with the one used for interfacing with glfw backend and that’s all. All the files should be located in the packages/imgui
Welcome to Medical-Chatbot-Gen-AI, a sophisticated medical chatbot built using Python, Llama3, Langchain, Flask, and Retrieval-Augmented Generation (RAG) architecture. This project aims to provide an interactive platform where users can get medical-related advice and information through an AI-powered chatbot. The chatbot is integrated with the Llama3 model and utilizes RAG for enhanced responses based on a large corpus of medical knowledge.
Features 🌟
AI-Powered Medical Chatbot
Provides medical advice and information based on user queries.
Utilizes advanced AI techniques to improve accuracy and relevance.
Llama3 Integration
Uses the Llama3 model for generating natural language responses with medical knowledge.
Llama3 powers the core of the chatbot’s ability to answer complex queries.
Langchain Support
Utilizes Langchain to manage conversational flows and integrate multiple tools for a seamless user experience.
Retrieval-Augmented Generation (RAG)
Enhances the chatbot’s capabilities by retrieving relevant information from a medical knowledge base and generating context-aware responses.
Flask Web Interface
A simple and intuitive Flask-based web interface to interact with the chatbot.
Medical Knowledge Base
Integration with publicly available medical datasets or custom medical knowledge bases for accurate and reliable information.
Tech Stack 🛠️
Python: The core programming language for building the application.
Flask: Web framework to deploy the chatbot and provide the web interface.
Llama3: A powerful language model for generating AI-driven responses.
Langchain: Tool for managing conversational workflows and integrating external data sources.
RAG (Retrieval-Augmented Generation): A technique to retrieve relevant information from a knowledge base for more accurate responses.
Medical Knowledge Base: The backend database for storing medical information (can be customized).
Prerequisites 📝
Before you begin, ensure you have the following installed:
Python 3.x
pip for package management
Flask
Langchain
Llama3 (or your preferred model)
OpenAI or any other LLM API key (for integration)
Installation 🚀
Follow the steps below to set up the project on your local machine.
1. Clone the Repository
git clone https://github.com/zeeshanali90233/Medical-Chatbot-Gen-AI.git
cd Medical-Chatbot-Gen-AI
Workshop at CSEE 2023: developing a reproducible workflow in R using functions, {targets} and {renv}
Developed and delivered by:
Alec L. Robitaille (Memorial University of Newfoundland and Labrador)
Isabella C. Richmond (Concordia University)
Schedule
Projects
Directories
READMEs
RStudio Projects
Short break
Functions
Introduction
Recommended approach
Checks
Options
Lunch break
{targets}
Introduction
Writing workflows
Visualizing
Running workflows
Extensions
Short break
{renv} + {conflicted}
Saving package versions
Checking conflicts
Learning goals
Overall
Approach analyses in a more holistic way (whole project vs script by script)
Share data across projects and software versions with minimal stress
Use workflows that reduce analysis errors and mental load
Section 1: Projects
Construct a RStudio project that is thoroughly documented using file structure and data management best practices
Use RStudio projects to effectively share their own work, and use other people’s
Section 2: Functions
Read and understand structure of functions in R
Refactor code into functions that do one thing
Add tests and checks to ensure functions work and error when expected
Recognize the value of functions as chunks of code that are reusable and easier to debug
Section 3: {targets}
(For a given project) map out relationships between inputs, outputs and analysis steps
Identify discrete chunks/steps and write corresponding (or use available) functions
Execute a workflow in {targets} that reads in data, performs a function, and saves an output
Recognize the value of workflows for reducing mental load and improving efficiency
Section 4: {renv} + {conflicted}
Use {renv} to preserve current package versions to ensure the environment is reproducible, portable and isolated
Use {conflicted} to detect conflicting function names
Setup
This workshop is aimed at improving our ability to use and create reproducible workflows. All the materials should be accessible from the side bar (slides, exercises, resources for further reading, and the link to the GitHub repository can be accessed by clicking on the GitHub icon).
We don’t have any strict dependencies on specific versions of R or R packages, but it would be good to have at least R version 4.0 and a recent version of RStudio.
We are using Quarto to build the workshop’s website and exercises, so it could be helpful for you to install it too. If you don’t have time to, you can always complete exercises in an R script – so no pressure.
Install first the Quarto CLI from the here then the package with the command at the bottom.
Please install the following packages (after updating R):
To download the workshop materials for a participant, use this command:
library(usethis)
# (Set your own destination directory)
use_course(
'https://github.com/robitalec/2023-CSEE-reproducible-workflows-workshop/archive/refs/heads/participant.zip',
destdir='~/Documents')
Example data for this workshop is borrowed from the Palmer Long-Term Ecological Research (LTER). Here is the study description from the Palmer LTER site:
The Palmer Long-Term Ecological Research (LTER) study area is located to the west of the Antarctic Peninsula extending South and North of the Palmer Basin from onshore to several hundred kilometers off shore. Palmer Station is one of the three United States research stations located in Antarctica. It is on Anvers Island midway down the Antarctic Peninsula at latitude 64.7 South, longitude 64.0 West.
The Palmer LTER studies a polar marine biome with research focused on the Antarctic pelagic marine ecosystem, including sea ice habitats, regional oceanography and terrestrial nesting sites of seabird predators. The Palmer LTER is one of more than 26 LTER research sites located throughout the United States, Puerto Rico and Tahiti; each focused on a specific ecosystem, that together constitute the LTER Network.
We gratefully acknowledge the Palmer LTER for releasing data freely and openly for diverse uses – in our case for training analytical skills of researchers in ecology.
Penguins
The first dataset is already available in R through the palmerpenguins R package. There is a raw version and a cleaned version. They contain data for 344 penguins, with the following variables (cleaned version):
species
island
bill_length_mm
bill_depth_mm
flipper_length_mm
body_mass_g
sex
year
Weather timeseries
The following datasets are available directly from the Palmer LTER Data Catalog. To download the data to the raw-data/ directory, run the function download_example_data() (R/download_example_data.R).
This second dataset contains monthly averaged weather timeseries from Palmer Station, Antarctica, with the following variables:
The library currently supports reads MaxMind GeoIP2 database and provide a thin decorator/helper function on the returned data for easy access and decoration on top of the geo info provided by MaxMind. It also provides a normalized way to represent the geo info in standard ISO format the scenario of unknown.
The implementation of this library is based upon other 2 open source repositories:
The library is visioned to support more features related to processing of the geo info data in the future. That means, support reading from multiple geo database providers and expose more helpers on the data for commonly encountered user scenarios.
Features
Support easy lookup for geo information from MaxMind DB using IP string.
Support both alpha2 country code and alpha3 country code.
Support any io.Reader for user to provide the MaxMind .mmdb file.
Support easy access of the database metadata info like build time and version.
Provide default return value of ZZ and ZZZ as specified in ISO standard if the country could not be found by the input IP using helper functions.
Installation
go get github.com/blockthrough/geo@v1.0.0
How To Use
Read Maxmind DB and LookUp Geo With IP
package main
import (
"embed""fmt""github.com/blockthrough/geo"
)
// go:embed <your_maxmind_db_file_path>varembedFS embed.FSfuncmain() {
file, err:=embedFS.Open("<your_maxmind_db_file_path>")
iferr!=nil {
return
}
maxmind, err:=geo.NewMaxMindFromReader(file)
iferr!=nil {
return
}
// check the meta information of the databasefmt.Sprintf("test db: %t", maxmind.IsTestDB())
fmt.Sprintf("db build time: %s", maxmind.BuildTimestamp())
fmt.Sprintf("db version: %s", maxmind.Version())
// you can pass ipv4 or ipv6 addresscountry, err:=maxmind.CountryByIPString("127.0.0.1")
iferr!=nil {
return
}
fmt.Sprintf("unknown country: %s", country.IsUnknown()) // is the country unknown?fmt.Sprintf("country code: %s", country.CountryAlpha2Code()) // 2-letter country codefmt.Sprintf("country 3-letter code: %s", country.CountryAlpha3Code()) // 3-letter country codefmt.Sprintf("continent code: %s", country.ContinentCode()) // 2-letter continent code// you can also use adapter function directly if you want to get alpha3 codefmt.Sprintf("country 3-letter code", geo.CountryAlpha2CodeToAlpha3Code(country.CountryAlpha2Code()))
}
Java library that represents a fraction as a ratio of two BigIntegers, reduced to lowest terms. A rich set of mathematical functions are supported.
Creating BigFractions
Constructors are protected. Create new BigFractions using valueOf(Number numerator), valueOf(Number numerator, Number denominator), or valueOf(String):
BigFraction.valueOf(new BigInteger("9999999999999999999"), BigInteger.valueOf(1));
// ->  9999999999999999999/1   (note that this is larger than Long.MAX_VALUE)

BigFraction.valueOf(new BigDecimal("1.23456789012345678901E-50"));
// ->  123456789012345678901/10000000000000000000000000000000000000000000000000000000000000000000000
You can even mix different Number types for numerator and denominator:
BigFraction.valueOf(1,0); // ArithmeticException - divide by zero
BigFraction.valueOf(0,0); // ArithmeticException - divide by zero
BigFraction.valueOf(Double.POSITIVE_INFINITY); //IllegalArgumentException
BigFraction.valueOf(Double.NaN); //IllegalArgumentException
There is also a LongFraction that represents a fraction as a ratio of two longs, with the same methods as BigFraction. The mathematics are much faster, but you run the risk of overflows.
How to Get BigFraction
The library is available via Maven Central and can be used in any project built using Maven or a compatible build tool (Ivy, Gradle, etc.).
You can also download the jar file from the repository and manually add it to your project, if you are not utilizing a supported build tool.
Support for Older Java Versions
I am currently building my jar files using Java 8, with source compatibility only for Java 8+. These jar files will not run in older versions of Java. If you need support for Java 6 or Java 7, notice that there are -java6 or -java7 versions available from Maven. These are compiled with compatibility to that Java version.
Проект содержит два шаблона для сборки Word-документов:
templates/gost-2-105.docx — в целом соотвествует требованиям ГОСТ 2.105-95, подходит для большинства текстовых документов, включая дипломы, диссертации, отчеты НИОКР и документацию, написанную по ГОСТ-19 (ЕСПД).
templates/gost-2-104.docx — в целом соотвествует требованиям ГОСТ 2.104-2006, с «рамками». Подходит для конструкторских документов по ЕСКД и ГОСТ-34 (АСУ ТП). Шаблон основан на шаблонах Руслана Шавалиева.
Работа с библиографией
Фолиант поддерживает работы с библиографическими файлами формата BibTeX. Путь к файлу со списком ссылок указывается в файле foliant.yml: bibliography: templates/refs.bib .
В самом тексте ссылка указывается так:
Библиографические ссылки по ГОСТ. [@gost7-2008]
Список используемых материалов автоматически добавится в конец файла.
Форматирование этого списка можно настроить подключением файла с конфигурацией стилей в foliant.yml: csl: templates/gost-numeric.csl. Больше стилей можно найти здесь.
Ссылки на изображения, таблицы, формулы
В образе подключено дополнение pandoc-xnos с помощью которого можно автоматически нумеровать и ссылаться на изображения, таблицы, формулы.
Yet another spotify client that focuses on presentation and user statistics, exposing a number of API calls.
This program uses SpotifyAPI-NET in a WPF .NET Core application.
Features
Miniplayer with playing track info
Progress bar and controls
Full screen view with album art
Playlist control and playback
Top songs playback and preview
Favorite song from miniplayer
Music Videos in full screen
Full user statistics and info
🚧 .NET 5.0 🚧
Overview
The default view of the application! Click the gifs for a sound preview.
Hovering over it reveals four buttons that perform the following:
Location
Symbol
Purpose
↖
⛶
Expands the program to be fullscreen with blur
↗
∞
Menu with various views based on your taste
↙
≡
Opens the playlist view, public and private
↘
♡
Likes a song, adding it to your favorite tracks
Mouse clicks and Keyboard controls are also supported.
Color
Keystroke
Purpose
Green
spacebar
Plays/Pauses current song
Blue
left/right
Returns to previous song or skips current song
Black
⠀
Allows dragging of window to desired location
⠀
f
Resizes to fullscreen
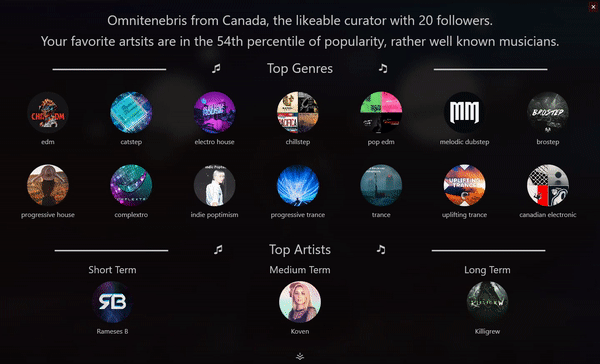
User Info View (click for sound)
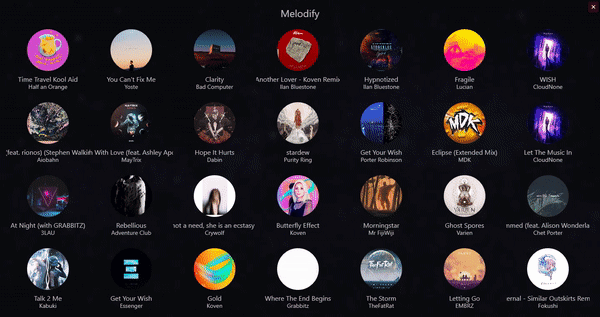
Top Songs View (click for sound)
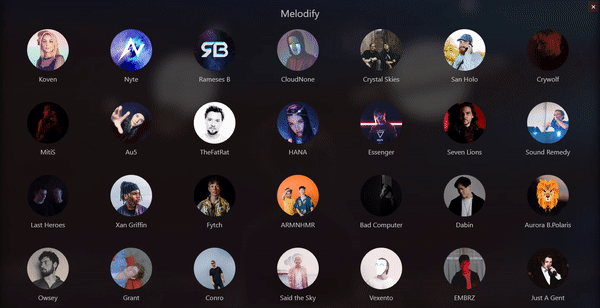
Top Artists View (click for sound)
Fullscreen View
Installation
Windows Users
Go to the Releases page and download the latest release
Currently only supports Windows 10, planning on further expansion if this picks up.
Development setup
Developed on Visual Studio 2019 – a WPF application using .NET
You’ll need to get your own Spotify API and YouTube API access.
Set up a Resources.resx file under the Solution Properties.
You’ll then need three variables, with their respective keys:
SpotID
SpotSecret
YoutubeAPI
Known Issues
Running as an admin breaks the music video feature
Various Views
Just to give an idea on what it generally looks like, the miniature view blurs and darkens the album art and uses it as the background as such:
enhanced error handling with indication of problem position in input
tokenizer is enough smart to proccess arbitrary formatted expressions
parser upgraded to work with unary operators
variables
simple functions (one line formulas, without subcalls)
meta commands(show something and etc…)
script mode, options
uses readline library(interactive editing)
autocomplete(functions and variables)
can create config file with predefined functions and variables
optimize(minimize) function expressions
api to interact with interpreter objects from go code
testing
go test .
building
go build -o calc ./cmd ./calc – to run
quick run
go run ./cmd
syntax
identifier: starts with letter, can consist of letters and digits(case-sensetive)
number: floating point number (dot as fraction separator)
variable:
variable_name: identifier
assignment: varable_name = expression variable variable_name with value of expression
example: var = 2 * 2 variable var with value 4
usage: variable_name => gives value of variable variable_name
example: var => 4
function:
function_name: @identifier
declaration: function_name = (variable_name [,variable_name]): expression function with name function_name with zero or more parameters(separated with comma), that used for calculate expression
example: @foo = (a, b): 2 * a - b
usage: function_name(expression [,expression]) call function function_name
example: @foo(4 - 1, 2) => 4
expression: consists of numbers, operators, function calls, variables
example -(a - @bar(1, (2.34 + c) * b)) * 5.1 - d / (100 - 1)
A fast and lightweight C++ project to generate, solve, and export Sudoku puzzles with varying constraints.
Description
The library handles any supported constraint through the following steps:
Constraints are reduced from a Sudoku problem to an Exact Covering with Colors problem (XCC).
The resulting problem is fed into an XCC solver heavily inspired by Donald Knuth’s SSXCC program.
The solutions to the XCC problem found, if any, are then reduced back to a Sudoku solution.
The XCC problem may be built with both primary and secondary items, depending on the constraints provided by the Sudoku problem, for which the following applies:
Primary items must be covered exactly once.
Secondary items must be covered at most once.
Secondary items can have a color assigned to them. These colored items are allowed to be covered by one or more options, as long as the colors are compatible.
Generated Sudokus can be exported to svg, where each constraint provides its own way of being drawn on the board.
The matrix-likedata structure used by Algorithm C can also be exported to an svg file for visual debugging.
The project consists of:
The libku library, used by the following executables
A ku_sandbox executable, useful for experimenting
A ku_unit_test executable
A ku_performance_test executable (generated only for Release builds)
Available Constraints
These are the classic sudoku constraints that are supported:
Sudoku Cell
Sudoku Row
Sudoku Column
Sudoku Box
The following are the non-classic constraints supported:
Anti-King
Anti-King (Torus)
Anti-Knight
Anti-Knight (Torus)
Asterisk
Disjoint Boxes
Hyper Sudoku
Negative Diagonal
Negative Diagonal Even
Negative Diagonal Odd
Positive Diagonal
Positive Diagonal Even
Positive Diagonal Odd
Getting Started
The build system used by the project is Meson, download and install it on your system.
Make sure you have a C++23-capable compiler.
The /bin directory is gitignored, the easiest way to generate a Debug build is to run the following in the root of the repository:
keyd and kmonad are both nice, but typing feels different (not necessarily bad, just different) from qmk (ok, typing on laptop feels bad anyway…)
xmk has x86 but only for zmk. I like qmk better and probably hacking this
together took the same amount of time I would have needed to fight with Weston
and Zephyr and their weird config and unintelligible errors (I did that some
time ago and it was no fun)
How does it work
Input/output same as keyd (grab device / output on uinput), processing qmk.
You’ll have to run as root (or change permissions for uinput and add your
user to input group – bad security!)
Config
Do a make first to rule out other problems. If the build is ok, look in
Makefile
First couple of lines, should be obvious. This is instead of qmk’s config.h
and rules.mk. Of course, there’s only a fraction of qmk’s settings to worry
about.
keyboards/<some_kb>/kb.c
This is qmk’s <kb_name>.c.
keyboards/<some_kb>/keymap.c
qmk‘s layers
keyboards/<some_kb>/layout.cpp
kbName and kbBlacklist are for picking the input (you can check your
keyboard’s name with xinput for instance).
layout – rows on your physical keyboard. For key names look in platforms/x86/cpp/keynames.cpp.
It doesn’t matter how you distribute your keys on rows/columns, it just has to
be the same in layout/keymap (it doesn’t have to look like a picture of your
keyboard)
Hacking
Besides qmk, almost all relevant code is in platforms/x86. I did very few
changes to qmk (but removed a lot from it, mostly to be able to search for
things more easily).
Makefile… well, can’t build qmk with g++ and I was too lazy to write C.
For other qmk features (like leader key, tap-dance, …) you’ll have to enable
them in Makefile, find the needed files, add them to the Makefile and fix build
errors.
I think at least a mutex is needed for catrix (var name to avoid “matrix”).
But it hasn’t crashed on me yet.
Plenty of room for improvement, like sleeping longer than 20ms in main loop and
waking it with an interrupt. Integrating with upstream qmk as another platform
(even though I don’t think future improvements in qmk will benefit a standard or
laptop keyboard).
Copyright
Whatever qmk and keyd have (this is mostly copy/paste from those 2
projects).


 https://github.com/akash1474/file_transfer