Category: Blog

  • workshop-advanced-python

    SciLifeLab Course: Quick and clean

    – advanced Python for data science in biology

    https://www.scilifelab.se/events/advanced-python-gbgvt17/

    Website

    https://nbisweden.github.io/workshop-advanced-python/

    conda create -n py35 python=3.5 anaconda
    [source] activate py35 #only activate on Win
    source deactivate

    “Complicated” way

    Alternatively, only if you are familiar with Docker, you can opt to run
    this as a Docker container. You have to install Docker on your machine.
    You can then download my container:

    $ docker pull grokkaine/pycourse

    Once you have the container, run it with (from the project git root):

    $ docker run --rm -p 8888:8888 -v /$(pwd):/home/jovyan/ grokkaine/pycourse

    That is making a port forwarding, opening your localhost to the docker client
    at port 8888. Also your local folder is now mounted to the Docker client. So
    all you do now is open a web browser at http://localhost:8888/tree.

    It is messy to work with containers, so here is a small reminder on how to
    cleanup:

    $ docker ps -a
    $ docker stop <container_id>
    $ docker rm <container_id>
    # check again to make sure you are clean
    $ docker ps -a
    
    # once you deleted all running containers, delete the images
    $ docker images
    # choose what you delete
    $ docker rmi -f <image_id>
    # check again to make sure you are clean
    $ docker images
    

    Run the jupyter/scipy-notebook container:

    docker run -d -p 8888:8888 jupyter/scipy-notebook
    

    Now go to [http://localhost:8888/tree] to see it in action.

    While the scipy stack is pretty solid (see 1), unfortunately pytables
    needs to be installed.

    To stop it:

    $ docker ps -a
    # copy the container id
    $ docker stop <container_id>
    

    Create your own container

    Go to your source root directory, containing the Dockerfile, and run:

    $ docker build -t pycourse .
    $ docker run -d -p 8888:8888 pycourse
    

    Now go to (http://localhost:8888/tree), open a Python 3 document and run
    import tables in a code cell. Voila!

    To get an interactive console, do this:

    $ sudo docker exec -it pycourse /bin/bash
    

    To copy one file from/to the docker container:

    $ docker cp 6fe37b4b7062:/home/jovyan/work/test.ipynb test.ipynb
    

    Otherwise we can just mount the local (host) folder to the docker client
    at run time.

    $ docker run -rm -d -p 8888:8888 -v /$(pwd):/home/jovyan/work/ pycourse
    $ docker ps -a
    # get container_id
    $ sudo docker exec -it <container_id> /bin/bash
    

    Visit original content creator repository
    https://github.com/NBISweden/workshop-advanced-python

  • NFT-Marketplace-Using-Biconomy-Social-Logins

    This is a [Next.js](https://nextjs.org/) project bootstrapped with [`create-next-app`](https://github.com/vercel/next.js/tree/canary/packages/create-next-app).

    ## Getting Started

    First, run the development server:

    “`bash
    npm run dev
    # or
    yarn dev
    # or
    pnpm dev
    # or
    bun dev
    “`

    Open [http://localhost:3000](http://localhost:3000) with your browser to see the result.

    You can start editing the page by modifying `pages/index.js`. The page auto-updates as you edit the file.

    [API routes](https://nextjs.org/docs/api-routes/introduction) can be accessed on [http://localhost:3000/api/hello](http://localhost:3000/api/hello). This endpoint can be edited in `pages/api/hello.js`.

    The `pages/api` directory is mapped to `/api/*`. Files in this directory are treated as [API routes](https://nextjs.org/docs/api-routes/introduction) instead of React pages.

    This project uses [`next/font`](https://nextjs.org/docs/basic-features/font-optimization) to automatically optimize and load Inter, a custom Google Font.

    ## Learn More

    To learn more about Next.js, take a look at the following resources:

    – [Next.js Documentation](https://nextjs.org/docs) – learn about Next.js features and API.
    – [Learn Next.js](https://nextjs.org/learn) – an interactive Next.js tutorial.

    You can check out [the Next.js GitHub repository](https://github.com/vercel/next.js/) – your feedback and contributions are welcome!

    ## Deploy on Vercel

    The easiest way to deploy your Next.js app is to use the [Vercel Platform](https://vercel.com/new?utm_medium=default-template&filter=next.js&utm_source=create-next-app&utm_campaign=create-next-app-readme) from the creators of Next.js.

    Check out our [Next.js deployment documentation](https://nextjs.org/docs/deployment) for more details.
    # NFT-Marketplace-Using-Biconomy-Social-Logins

    Visit original content creator repository
    https://github.com/usman-qsols/NFT-Marketplace-Using-Biconomy-Social-Logins

  • DragonTet

    ///////////////////
    DragonTet v1.1 2025
    ///////////////////
    
    Programming: salvaKantero
    Betatesting: Luna_314
    
    Compatible with:
    - Dragon 32/64
    - Tandy Color Computer 1/2/3
    *at least 16 kb.
    
    The objective of DragonTet is to move, rotate, and place the falling pieces to form complete horizontal lines on the game board.
    Each time you complete a line, it disappears, freeing up space on the board and increasing your score.
    By completing a certain number of lines, the game level increases. With each level, the falling speed of the pieces accelerates, making the game more challenging.
    If the pieces stack up to the top of the board and you can no longer place them, the game is over!
    
    Single-Player Mode:
      Compete to achieve the highest score possible.
      From level 4 onwards, every 12 pieces played will generate trap lines or blocks.
    
    Two-Player Mode (Optional):
      Each player has their own board.
      The winner is the one who survives the longest or achieves the highest score.
      From level 4 onwards, trap blocks and lines are generated on the opponent's board every 3 lines completed.


    CONTROLS
    ========
    
    PLAYER 1:
    
    Rotate piece:
      Press <W>, the up arrow key, or joystick 1 up.
    
    Move piece left:
      Press <A>, the left arrow key, or joystick 1 left.
    
    Soft drop (faster descent):
      Press <S>, the down arrow key, or joystick 1 down.
    
    Move piece right:
      Press <D>, the right arrow key, or joystick 1 right.
    
    PLAYER 2:
    
    Rotate piece:
      Press <I> or joystick 2 up.
    
    Move piece left:
      Press <J> or joystick 2 left.
    
    Soft drop (faster descent):
      Press <K> or joystick 2 down.
    
    Move piece right:
      Press <L> or joystick 2 right.
    
    COMMON CONTROLS:
    
    Pause:
      Press <H> to pause. Any other key to continue.
    
    Cancel:
      Press <X> to exit the game at any time and return to the main menu.


    SCORING
    =======
    
    1 line:   100 × level number
    2 lines:  300 × level number
    3 lines:  500 × level number
    4 lines:  800 × level number
    
    * Soft dropping a piece awards 1 point per row descended.


    TIPS AND TRICKS
    ===============
    
    Plan Ahead:
      Observe the next piece to plan where to place the current one.
    
    Keep the Board Tidy:
      Try to keep the board as clear as possible to avoid running out of space.
    
    Maximise Your Score:
      Aim to complete multiple lines at the same time for higher scores.


    PACKAGE CONTENTS
    ================
    
    - dtet.c: Source code (includes compilation instructions)
    - dtetdr.bin: Binary file for running on Dragon 32/64/200/Tano emulators
    - dtetdr.cas: Simple cassette file for loading on Dragon 32/64/200/Tano emulators
    - dtetdr.vdk: Simple diskette file for loading on Dragon 64/200/Tano emulators
    - dtetdr.wav: Audio file for recording onto a real cassette compatible with Dragon 32/64/200/Tano
    - dtetcc.bin: Binary file for running on Tandy Coco 1/2/3 emulators
    - dtetcc.cas: Simple cassette file for loading on Tandy Coco 1/2/3 emulators
    - dtetcc.wav: Audio file for recording onto a real cassette compatible with Tandy Coco 1/2/3
    - dtet.png: Cassette cover
    - Readme.txt/Leeme.txt: This file. Instructions and additional information
    - License.txt: Legal information about the licence
    
    * BIN files generated with ‘CMOC’ v0.1.89 by Pierre Sarrazin
      http://sarrazip.com/dev/cmoc.html
    
    * CAS/WAV files generated with ‘bin2cas.pl’ v3.14 by Ciaran Anscomb
      https://www.6809.org.uk/dragon/bin2cas.pl
    
    * VDK file generated with ‘DragonDOS’ v1.0.3 by Robcfg
      https://github.com/robcfg/retrotools/releases
    
    Dragontet is released under GPL v3 for all software components* (see license.txt).
    C SOURCE CODE AND RESOURCES AVAILABLE AT https://github.com/salvakantero/Dragontet
    

    Visit original content creator repository
    https://github.com/salvakantero/DragonTet

  • Entertainment-project

    Getting Started with Create React App

    This project was bootstrapped with Create React App.

    Available Scripts

    In the project directory, you can run:

    npm start

    Runs the app in the development mode.
    Open http://localhost:3000 to view it in the browser.

    The page will reload if you make edits.
    You will also see any lint errors in the console.

    npm test

    Launches the test runner in the interactive watch mode.
    See the section about running tests for more information.

    npm run build

    Builds the app for production to the build folder.
    It correctly bundles React in production mode and optimizes the build for the best performance.

    The build is minified and the filenames include the hashes.
    Your app is ready to be deployed!

    See the section about deployment for more information.

    npm run eject

    Note: this is a one-way operation. Once you eject, you can’t go back!

    If you aren’t satisfied with the build tool and configuration choices, you can eject at any time. This command will remove the single build dependency from your project.

    Instead, it will copy all the configuration files and the transitive dependencies (webpack, Babel, ESLint, etc) right into your project so you have full control over them. All of the commands except eject will still work, but they will point to the copied scripts so you can tweak them. At this point you’re on your own.

    You don’t have to ever use eject. The curated feature set is suitable for small and middle deployments, and you shouldn’t feel obligated to use this feature. However we understand that this tool wouldn’t be useful if you couldn’t customize it when you are ready for it.

    Learn More

    You can learn more in the Create React App documentation.

    To learn React, check out the React documentation.

    Visit original content creator repository
    https://github.com/Rasif-Taghizada/Entertainment-project

  • DoubleDoubleStatistic

    DoubleDoubleStatistic

    Double-Double Statistic Implements

    Requirement

    .NET 8.0
    DoubleDouble
    DoubleDoubleComplex
    Algebra

    Install

    Download DLL
    Download Nuget

    Implemented Distributions

    Continuous

    category distribution PDF CDF quantile statistic fitting random generation note
    stable cauchy
    delta
    holtsmark
    landau
    levy
    map-airy
    normal
    sas point5
    linearity cosine
    davis CDF and Quantile take longer to calculate.
    frechet
    gumbel
    johnson sb
    johnson su
    laplace
    logistic
    skew cauchy
    skew normal Quantile take longer to calculate.
    uniform
    u quadratic
    weibull
    scalable benini
    birnbaum saunders
    exponential
    folded normal
    gamma
    gompertz
    half cauchy
    half logistic
    half normal
    hyperbolic secant
    inverse gauss Quantile take longer to calculate.
    log logistic
    lomax
    maxwell
    q-exponential Accuracy decreases when q is nearly 2.
    q-gaussian Accuracy decreases when q is nearly 3.
    pareto
    rayleigh
    voigt CDF and Quantile take longer to calculate.
    wigner semicircle
    continuous alpha
    arcsine
    argus
    benktander Quantile take longer to calculate.
    bates n ≤ 128
    beta
    beta prime
    bradford
    burr
    chi
    chi square
    dagum
    fisher z
    fisk
    hotelling t sq
    inverse gamma
    inverse chi
    inverse chi sq
    irwin hall n ≤ 128
    kumaraswamy
    log normal
    nakagami
    noncentral beta Accuracy decreases when non-centricity is large.
    noncentral chi sq Accuracy decreases when non-centricity is large.
    noncentral f Accuracy decreases when non-centricity is large.
    noncentral t Accuracy decreases when non-centricity is large.
    power
    reciprocal
    rice CDF and Quantile take longer to calculate.
    snedecor f
    student t
    trapezoid
    triangular
    tukey lambda

    Discrete

    category distribution PMF statistic fitting random generation note
    discrete bernoulli
    benford
    binary
    binomial
    categorical
    discrete uniform
    gausskuzmin
    geometric
    hyper geometric
    logarithmic
    negative binomial
    pascal
    poisson
    skellam
    yule simon
    zipf

    Directional

    category distribution PDF statistic fitting random generation note
    directional circular cauchy Not implemented: kurtosis
    von mises Not implemented: kurtosis
    sphere uniform Not implemented: kurtosis
    von mises fisher Dim=3, Not implemented: kurtosis

    MultiVariate

    category distribution PDF statistic fitting random generation note
    multivariate ball uniform
    dirichlet
    disk uniform
    multi normal

    Usage

    NormalDistribution dist = new(mu: 1, sigma: 3);
    
    // PDF
    for (ddouble x = -4; x <= 4; x += 0.125) {
        ddouble pdf = dist.PDF(x);
    
        Console.WriteLine($"pdf({x})={pdf}");
    }
    
    // CDF
    for (ddouble x = -4; x <= 4; x += 0.125) {
        ddouble ccdf = dist.CDF(x, Interval.Upper);
    
        Console.WriteLine($"ccdf({x})={ccdf}");
    }
    
    // Quantile
    for (int i = 0; i <= 10; i++) {
        ddouble p = (ddouble)i / 10;
        ddouble x = dist.Quantile(p, Interval.Upper);
    
        Console.WriteLine($"cquantile({p})={x}");
    }
    
    // Statistic
    Console.WriteLine($"Support={dist.Support}");
    Console.WriteLine($"Mu={dist.Mu}");
    Console.WriteLine($"Sigma={dist.Sigma}");
    Console.WriteLine($"Mean={dist.Mean}");
    Console.WriteLine($"Median={dist.Median}");
    Console.WriteLine($"Mode={dist.Mode}");
    Console.WriteLine($"Variance={dist.Variance}");
    Console.WriteLine($"Skewness={dist.Skewness}");
    Console.WriteLine($"Kurtosis={dist.Kurtosis}");
    Console.WriteLine($"Entropy={dist.Entropy}");
    
    // Random Sampling
    Random random = new(1234);
    double[] xs = dist.Sample(random, 100000).ToArray();
    
    // Fitting
    // note: The distribution that minimizes the squared error 
    //       of the quantile function over the specified interval is return.
    (NormalDistribution? dist_fit, ddouble error) = 
        NormalDistribution.Fit(xs, fitting_quantile_range: (0.1, 0.9));

    Typical parameter symbols

    category symbol note
    support parameter k
    a, b uniform
    a, b, c triangular
    shape parameter alpha
    alpha, beta beta, beta prime
    gamma, delta johnson sb, su
    eta gompertz
    nu chi, chisq, student t
    n irwin hall
    n, m fisher z, snedecor f
    c stable distributions
    location parameter mu
    scale parameter sigma error-related distributions
    theta time-related distributions
    s, r otherwise
    non-centricity parameter lambda
    mu non-central student t

    Licence

    MIT

    Author

    T.Yoshimura

    Visit original content creator repository
    https://github.com/tk-yoshimura/DoubleDoubleStatistic

  • find-me

    Find Me

    An innovative Android app made with Flutter and Firebase. Utilizing the Bloc pattern for state management, this app allows you to find the location of another phone on a map and use a compass to aim towards it.

    Features

    • Map view to find phone location
    • Compass to aim towards phone location
    • Provide distance between 2 phones
    • Shows message for target phone
    • Works in the background option
    • Utilizes Bloc pattern for state management
    • Built with Flutter and Firebase
    • Unit test Exemple

    Getting Started

    These instructions will get you a copy of the project up and running on your local machine for development and testing purposes.

    Prerequisites

    • Flutter SDK
    • Android emulator or a physical device to run the app
    • Firebase Account

    Installing

    1. Clone the repository to your local machine:
    git clone https://github.com/SamehGbuibia/find-me.git
    
    1. Open the project in your preferred IDE and install the required dependencies by running the following command:
    flutter packages get
    
    1. Create new Firebase project
    2. Connect it to find me (skip Initialize Firebase and add plugins )
    3. Enable Firestore Database
    4. Run the app on an Android device or emulator

    Built With

    • Flutter
    • Firebase
    • Geolocator
    • Flutter_compass
    • Flutter_background_service

    Authors

    Sameh Gbuibia – https://github.com/SamehGbuibia

    License

    This project is licensed under the GPL-3.0 License.

    Visit original content creator repository
    https://github.com/SamehGbuibia/find-me

  • Next-Level-Web-Development

    NEXT LEVEL WEB DEVELOPMENT

    GitHub watchers goto badge GitHub repo file count GitHub repo size GitHub GitHub commit activity GitHub contributors GitHub last commit

    All the codes, notes, and ideas from the Next Level Web Development courses will be added here.


    NOTE: Notes will be added by Mission name
    

    CONTENTS:


    Roadmap

    1. Roadmap

    MISSIONS

    Mission 0: Welcome To Next Level Web Development (Module: 0 – 1)
    Mission 1: Be a TypeScript Technocrat (Module: 2 – 5.5)
    1. Module 2: Explore Basic Types of TypeScript
    2. Module 3: Explore Advance Types of TypeScript
    3. Module 4: Object-Oriented Programming in TypeScript
    4. Module 5 Assignment 1
    5. Module 5.5: Bonus Module
    Mission 2: Be A Mongoose Master (Module: 6 – 9)
    1. Module 6: Installation and Explore Read and Write Queries
    2. Module 7: Explore Mongoose More Queries
    3. Module 8: MongoDB Aggregation Framework and Indexing
    4. Module 8.5: Simple Mongoose Practice
    5. Module 9: Assignment 2
    Mission 3: Be A NoSQL Backend Braniac (Module: 10 – 19)
    1. Module 10: SDLC, Requirement Analysis and Project Setup
    2. Module 11: How to set up and organize your project professionally
    3. Module 12: Building The Auth Service Part 2
    4. Module 13: Error handling, Zod, Pagination & Academic Semester
    5. Module 14: Pagination, Filtering, Complete Academic Semester
    6. Module 15: Complete Student Module, Implement Transaction and Rollback, Practice Faculty Module
    7. Module 15.5: Practice Day
    8. Module 16: Assignment 3
    9. Module 17: Implement Authentication & Authorization using JWT
    10. Module 18: Assignment 4
    11. Module 19: Complete Update Password System
    Mission 4: Be A Redux Reaper (Module: 20 – 23)
    1. Module 20: Get started with Redux. A deep dive into Redux’s philosophy
    2. Module 21: Hands-on State Management & Crud Operation
    3. Module 22: Handling async tasks using Redux
    4. Module 23: Assignment 5
    Mission 5: Be A NextJS Ninja (Module: 24 – 27)
    1. Module 24: Fundamentals of Next.Js
    2. Module 25: Next Level Data Fetching in Next.Js
    3. Module 26: Explore NextAuth & App Router
    4. Module 26.5: Practice Day
    5. Module 27: Assignment-6

    USED PACKAGES

    1. yarnYarn is a package manager that doubles down as project manager
    2. typescriptTypeScript is JavaScript with syntax for types
    3. nodemonSimple monitor script for use during development of a Node.js app
    4. ts-node-devTypeScript execution environment and REPL for node.js
    5. antdAn enterprise-class UI design language and React UI library with a set of high-quality React components, one of best React UI library for enterprises
    6. json-serverGet a full fake REST API with zero coding in less than 30 seconds (seriously)
    7. react-reduxThe official, opinionated, batteries-included toolset for efficient Redux development
    8. mongodbThe official MongoDB driver for Node.js.
    9. viteNext Generation Frontend Tooling.
    10. tailwindcssA utility-first CSS framework.
    11. react-router-domReact Router enables “client side routing”.
    12. @reduxjs/toolkitThe Redux Toolkit package is intended to be the standard way to write Redux logic.
    13. react-reduxReact Redux is the official React UI bindings layer for Redux.

    TOOLS

    1. typescript-mongoose-eslint-husky-staged boilerplate
    2. BreakTimer
    3. Redux DevTools

    ARTICLES

    1. NVM for Windows – How to Download and Install Node Version Manager in Windows 10
    2. Pick Function Refactoring & Property Management
    3. All about Express Error Handling
    4. Exploring $exists, $type and $size operators
    5. Exploring the Power of $inc, $max, $min, and $mul Operators of MongoDb
    6. MongoDB $and Operator
    7. MongoDB’s Update Operators: Mastering $push, $set, and $addToSet for Efficient Data Management
    8. Unleashing the Power of Querying : Discover MongoDB’s $not and $nor Operators
    9. Boost Your MongoDB Queries: Deep Dive into $in, $nin, and $or Operators
    10. Permanently removing a file from git history
    11. Create a JSON server
    12. What is the difference between fallback false vs true vs blocking of getStaticPaths with and without revalidate in Next.js SSR/ISR?
    13. How to use different .env files with nextjs?

    DO NOT FORGET TO DO

    Vercel এ ডেপ্লয় এর ক্ষেত্রে কয়েকটি জিনিস খেয়াল রাখতে হবে
    Vercel এ ডেপ্লয় এর ক্ষেত্রে কয়েকটি জিনিস খেয়াল রাখতে হবে
    • tsconfig.json এর মধ্যে
    "module": "commonjs" */* Specify what module code is generated. */*,
    "rootDir": "./src" */* Specify the root folder within your source files. */*,
    "outDir": "./dist" */* Specify an output folder for all emitted files. */*,

    এই কনফিগটি add করে নিতে হবে যদি আগে থেকে করা না থাকে

    • package.json এর মধ্যে
    "scripts": {
        "dev": "ts-node-dev --respawn --transpile-only src/server.ts",
        "start": "node dist/server.js",
        "build": "tsc"
    }
    • প্রজেক্টের রুট এর মধ্যে vercel.json ফাইল বানিইয়ে নিতে হবে
    {
    
        "version": 2,
            "builds": [
            {
                "src": "dist/server.js",
                "use": "@vercel/node"
            }
        ],
            "routes": [
            {
                "src": "/(.*)",
                "dest": "dist/server.js"
            }
        ]
    }

    এরপর Cli দিয়ে deploy করে নিলেই কাজ শেষ , সার্ভার রেডি

    If you need to change the environment variable of Vercel production always make sure to have a push to the main branch.


    TUTORIALS

    1. Git – How to Duplicate a Repository with History ( Full duplicate, no fork)
    2. How to test a local website on your phone

    INSPIRATIONS

    1. Wallpaper – For daily inspiration

    CONTRIBUTE

    Contributions are always welcome! Please read the contribution guidelines first.


    SPECIAL THANKS

    1. Tauhid Hasan for his typescript-mongoose-eslint-husky-staged boilerplate
    2. Dipto Karmaker for his suggestion to use BreakTimer
    3. Mezbaul Abedin Forhan for Pick Function Refactoring & Property Management
    4. Mezbaul Abedin Forhan for All about Express Error Handling
    5. Mezbaul Abedin Forhan for MongoDB $and Operator
    6. Ehtisam Haq for Exploring $exists, $type and $size operators
    7. Anisur Rahman for Exploring the Power of $inc, $max, $min, and $mul Operators of MongoDb
    8. Mehedi Anik for MongoDB’s Update Operators: Mastering $push, $set, and $addToSet for Efficient Data Management
    9. Samin Israr Ravi for Unleashing the Power of Querying : Discover MongoDB’s $not and $nor Operators
    10. Tanmoy Parvez for Boost Your MongoDB Queries: Deep Dive into $in, $nin, and $or Operators
    11. Simba for Permanently removing a file from git history
    12. Jason Cheung for Git – How to Duplicate a Repository with History ( Full duplicate, no fork)

    LICENSE

    CC0

    To the extent possible under law, M♢NTΛSIM has waived all copyright and related or neighboring rights to this work.


    feel free to contact me svg

    Linkedin icon GitHub icon StackOverflow icon web icon Gmail icon Facebook icon Twitter icon

    Visit original content creator repository https://github.com/montasim/Next-Level-Web-Development
  • Mining-Data-Viewer

    Mining Projects Explorer

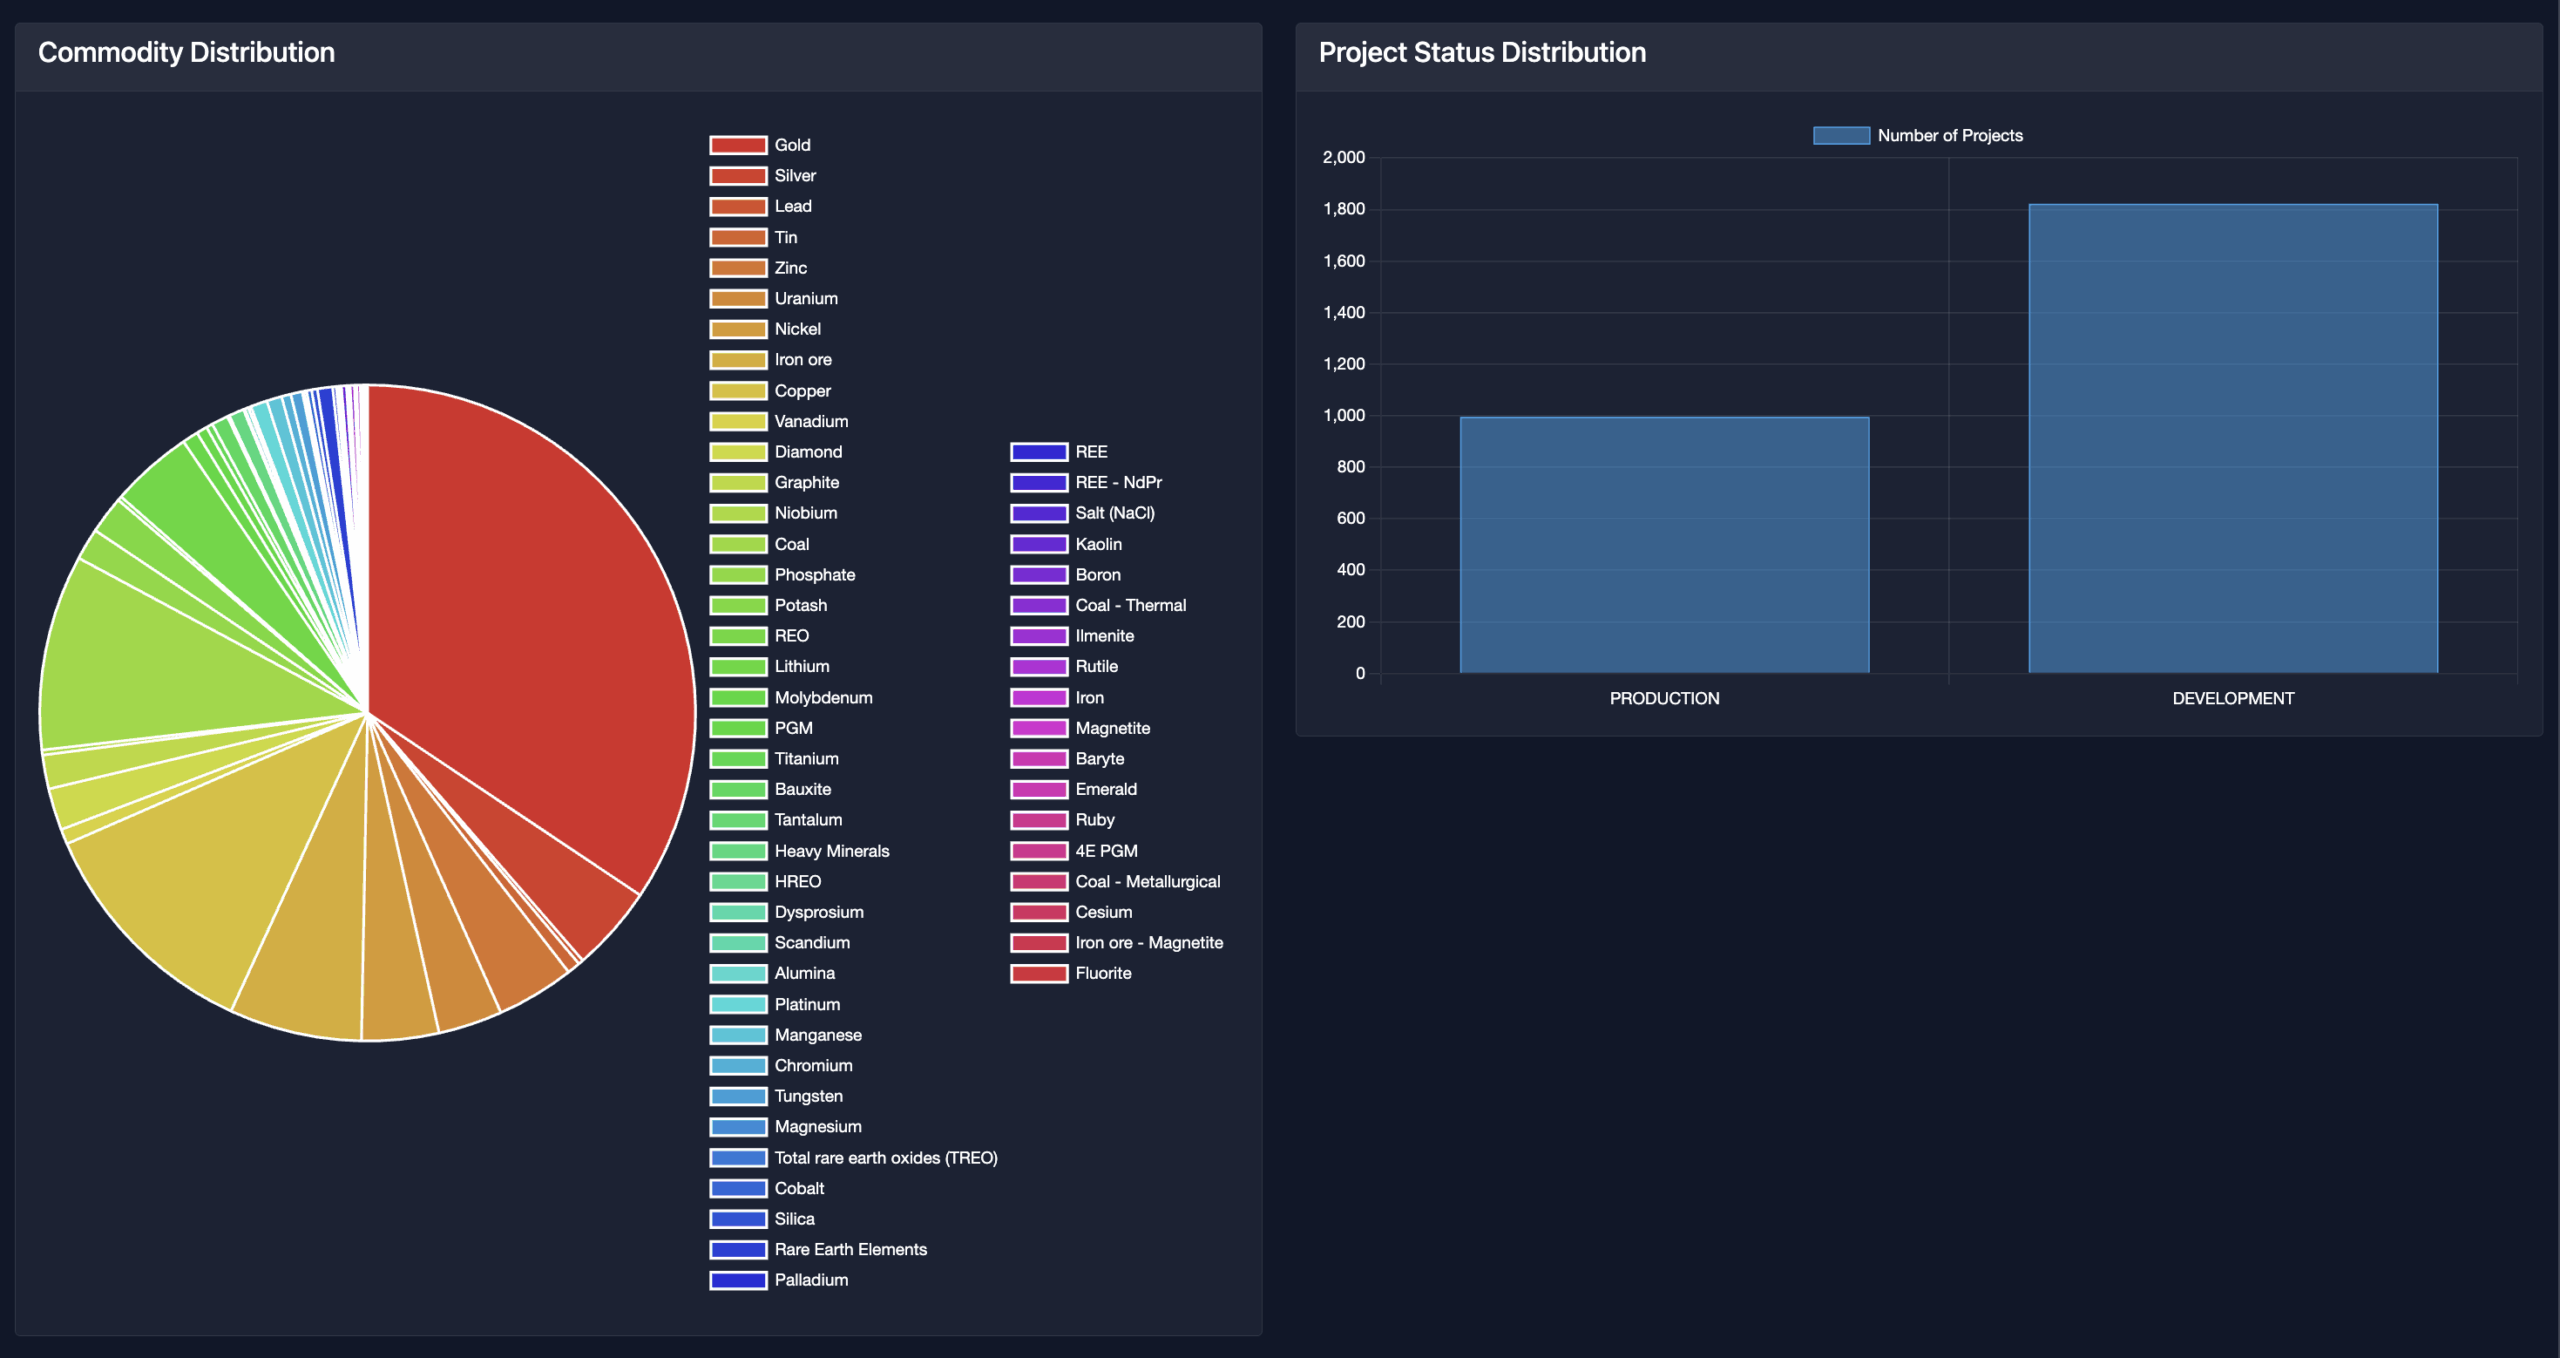
    A FastAPI-based web application that visualizes and analyzes mining projects data from Digbee’s API. The application provides an interactive dashboard to explore mining projects, their locations, and nearby operations within a 500km radius.

    Application Screenshots

    Analytics Dashboard

    Analytics Dashboard Visualizes commodity distribution and project status breakdown across the mining industry
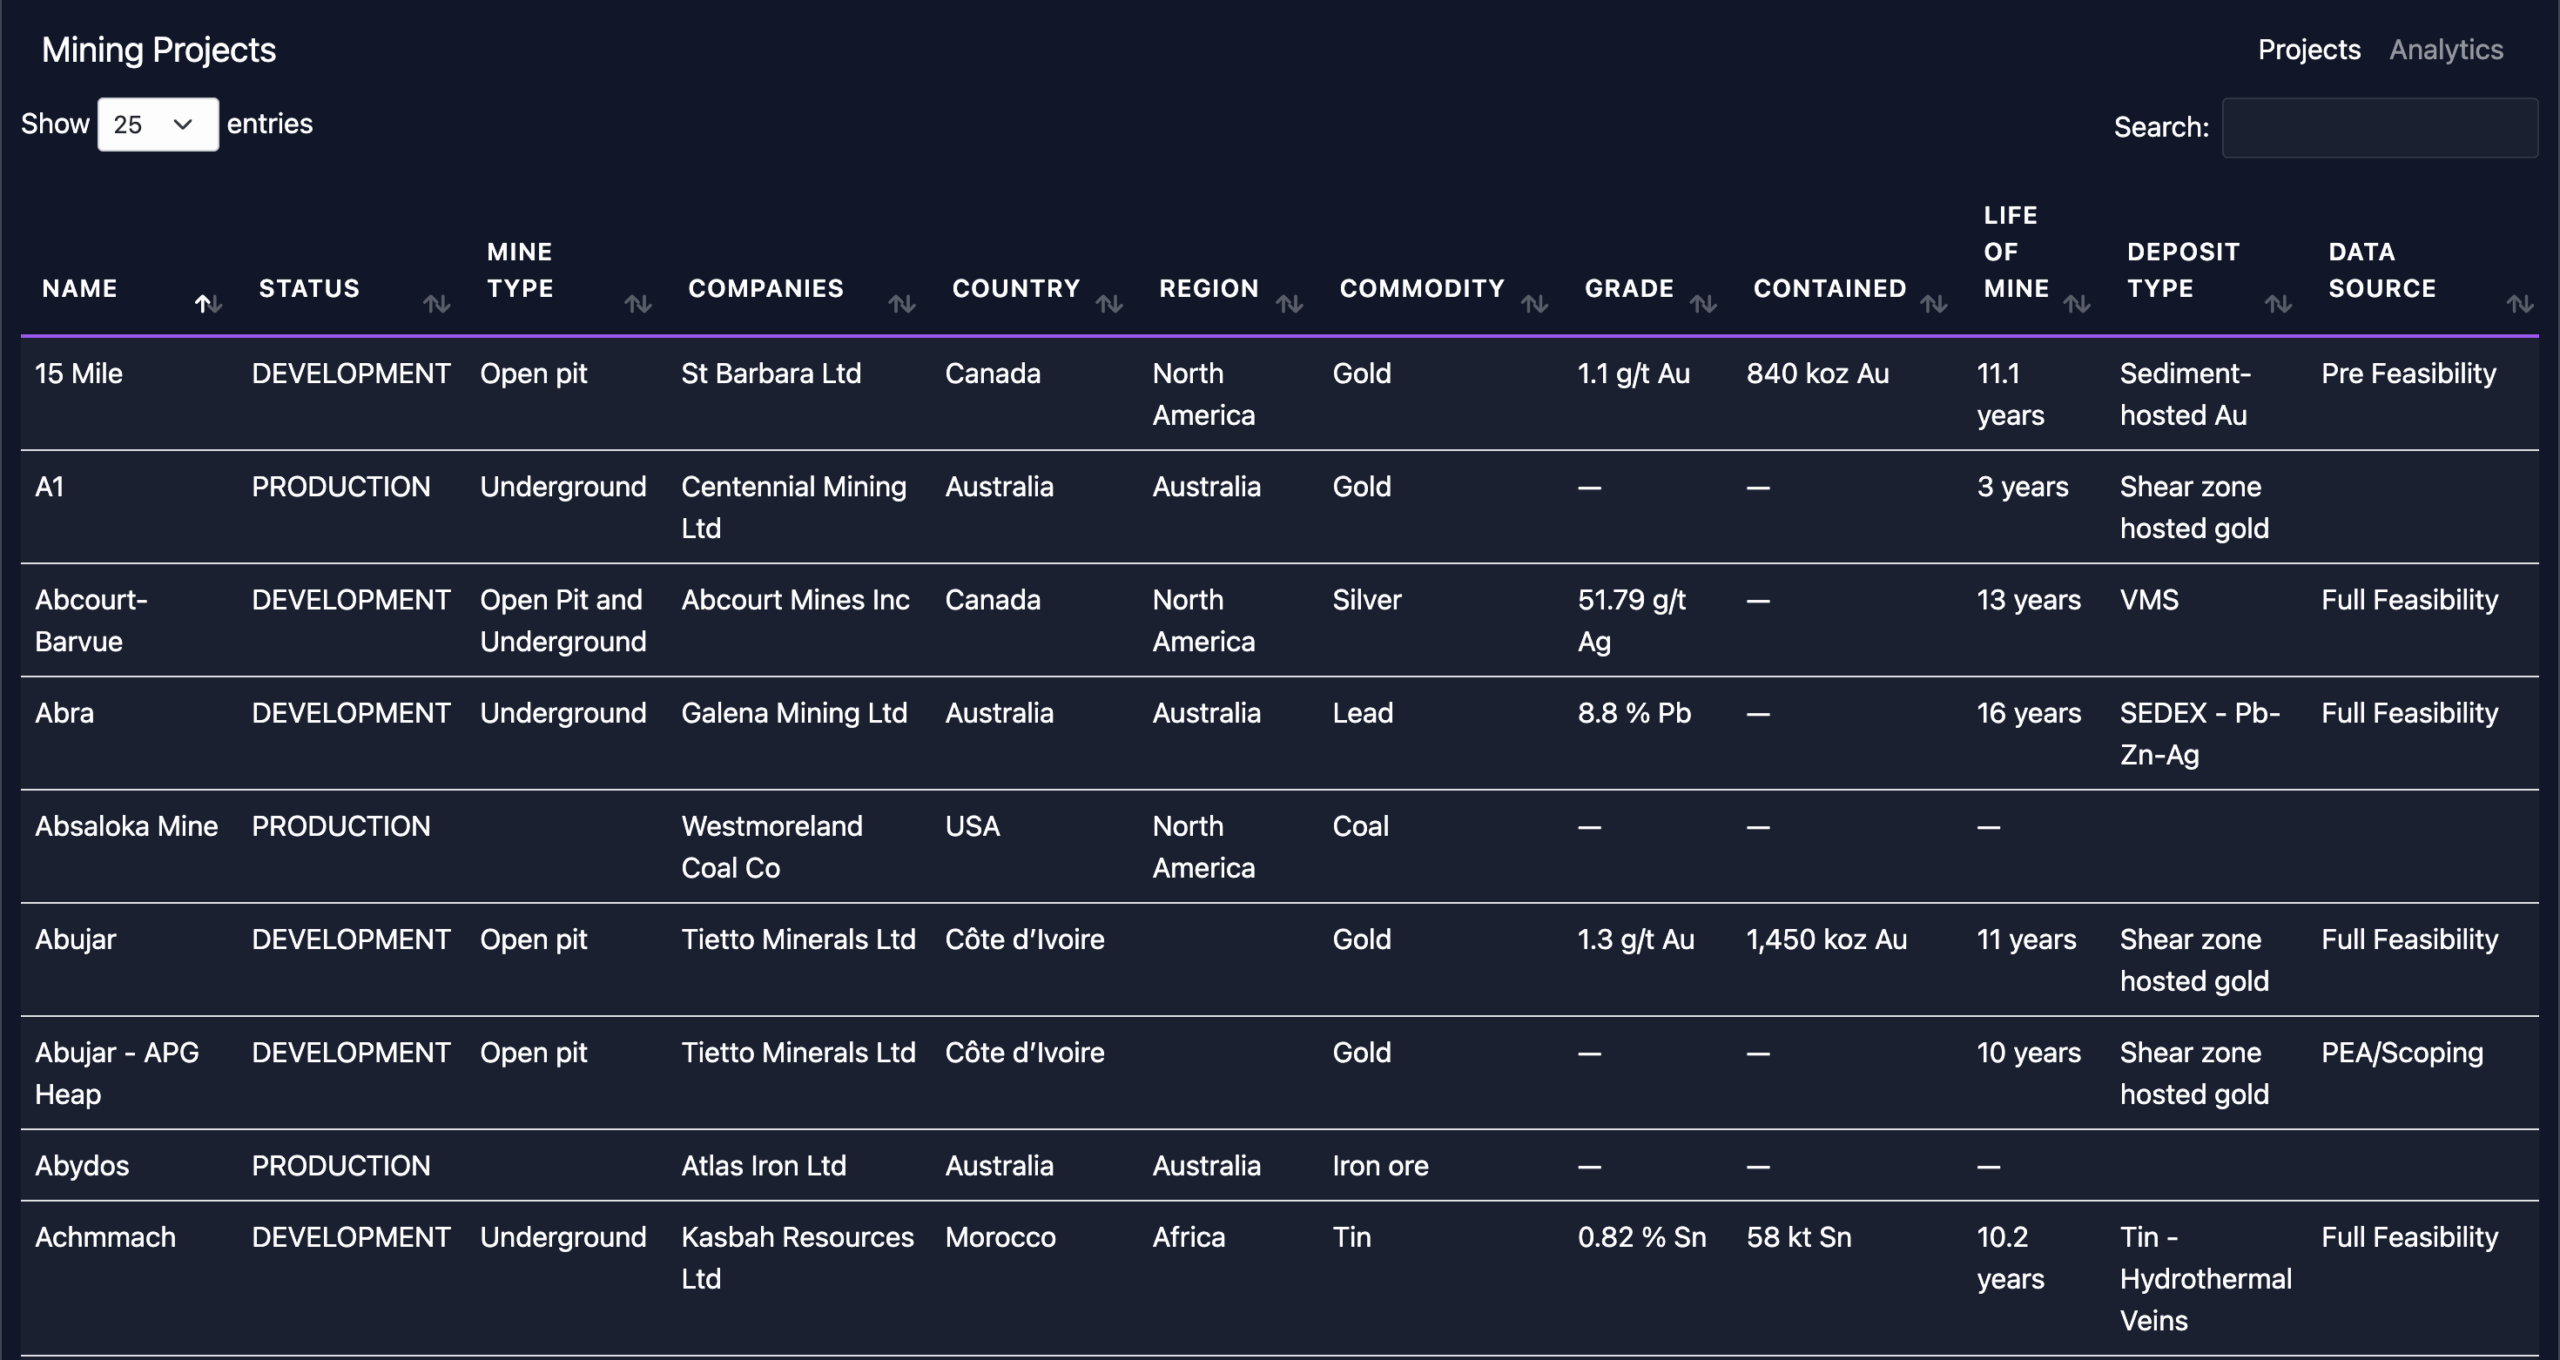
    Project List View

    Project List View Interactive table showing detailed mining project information with sorting and filtering capabilities
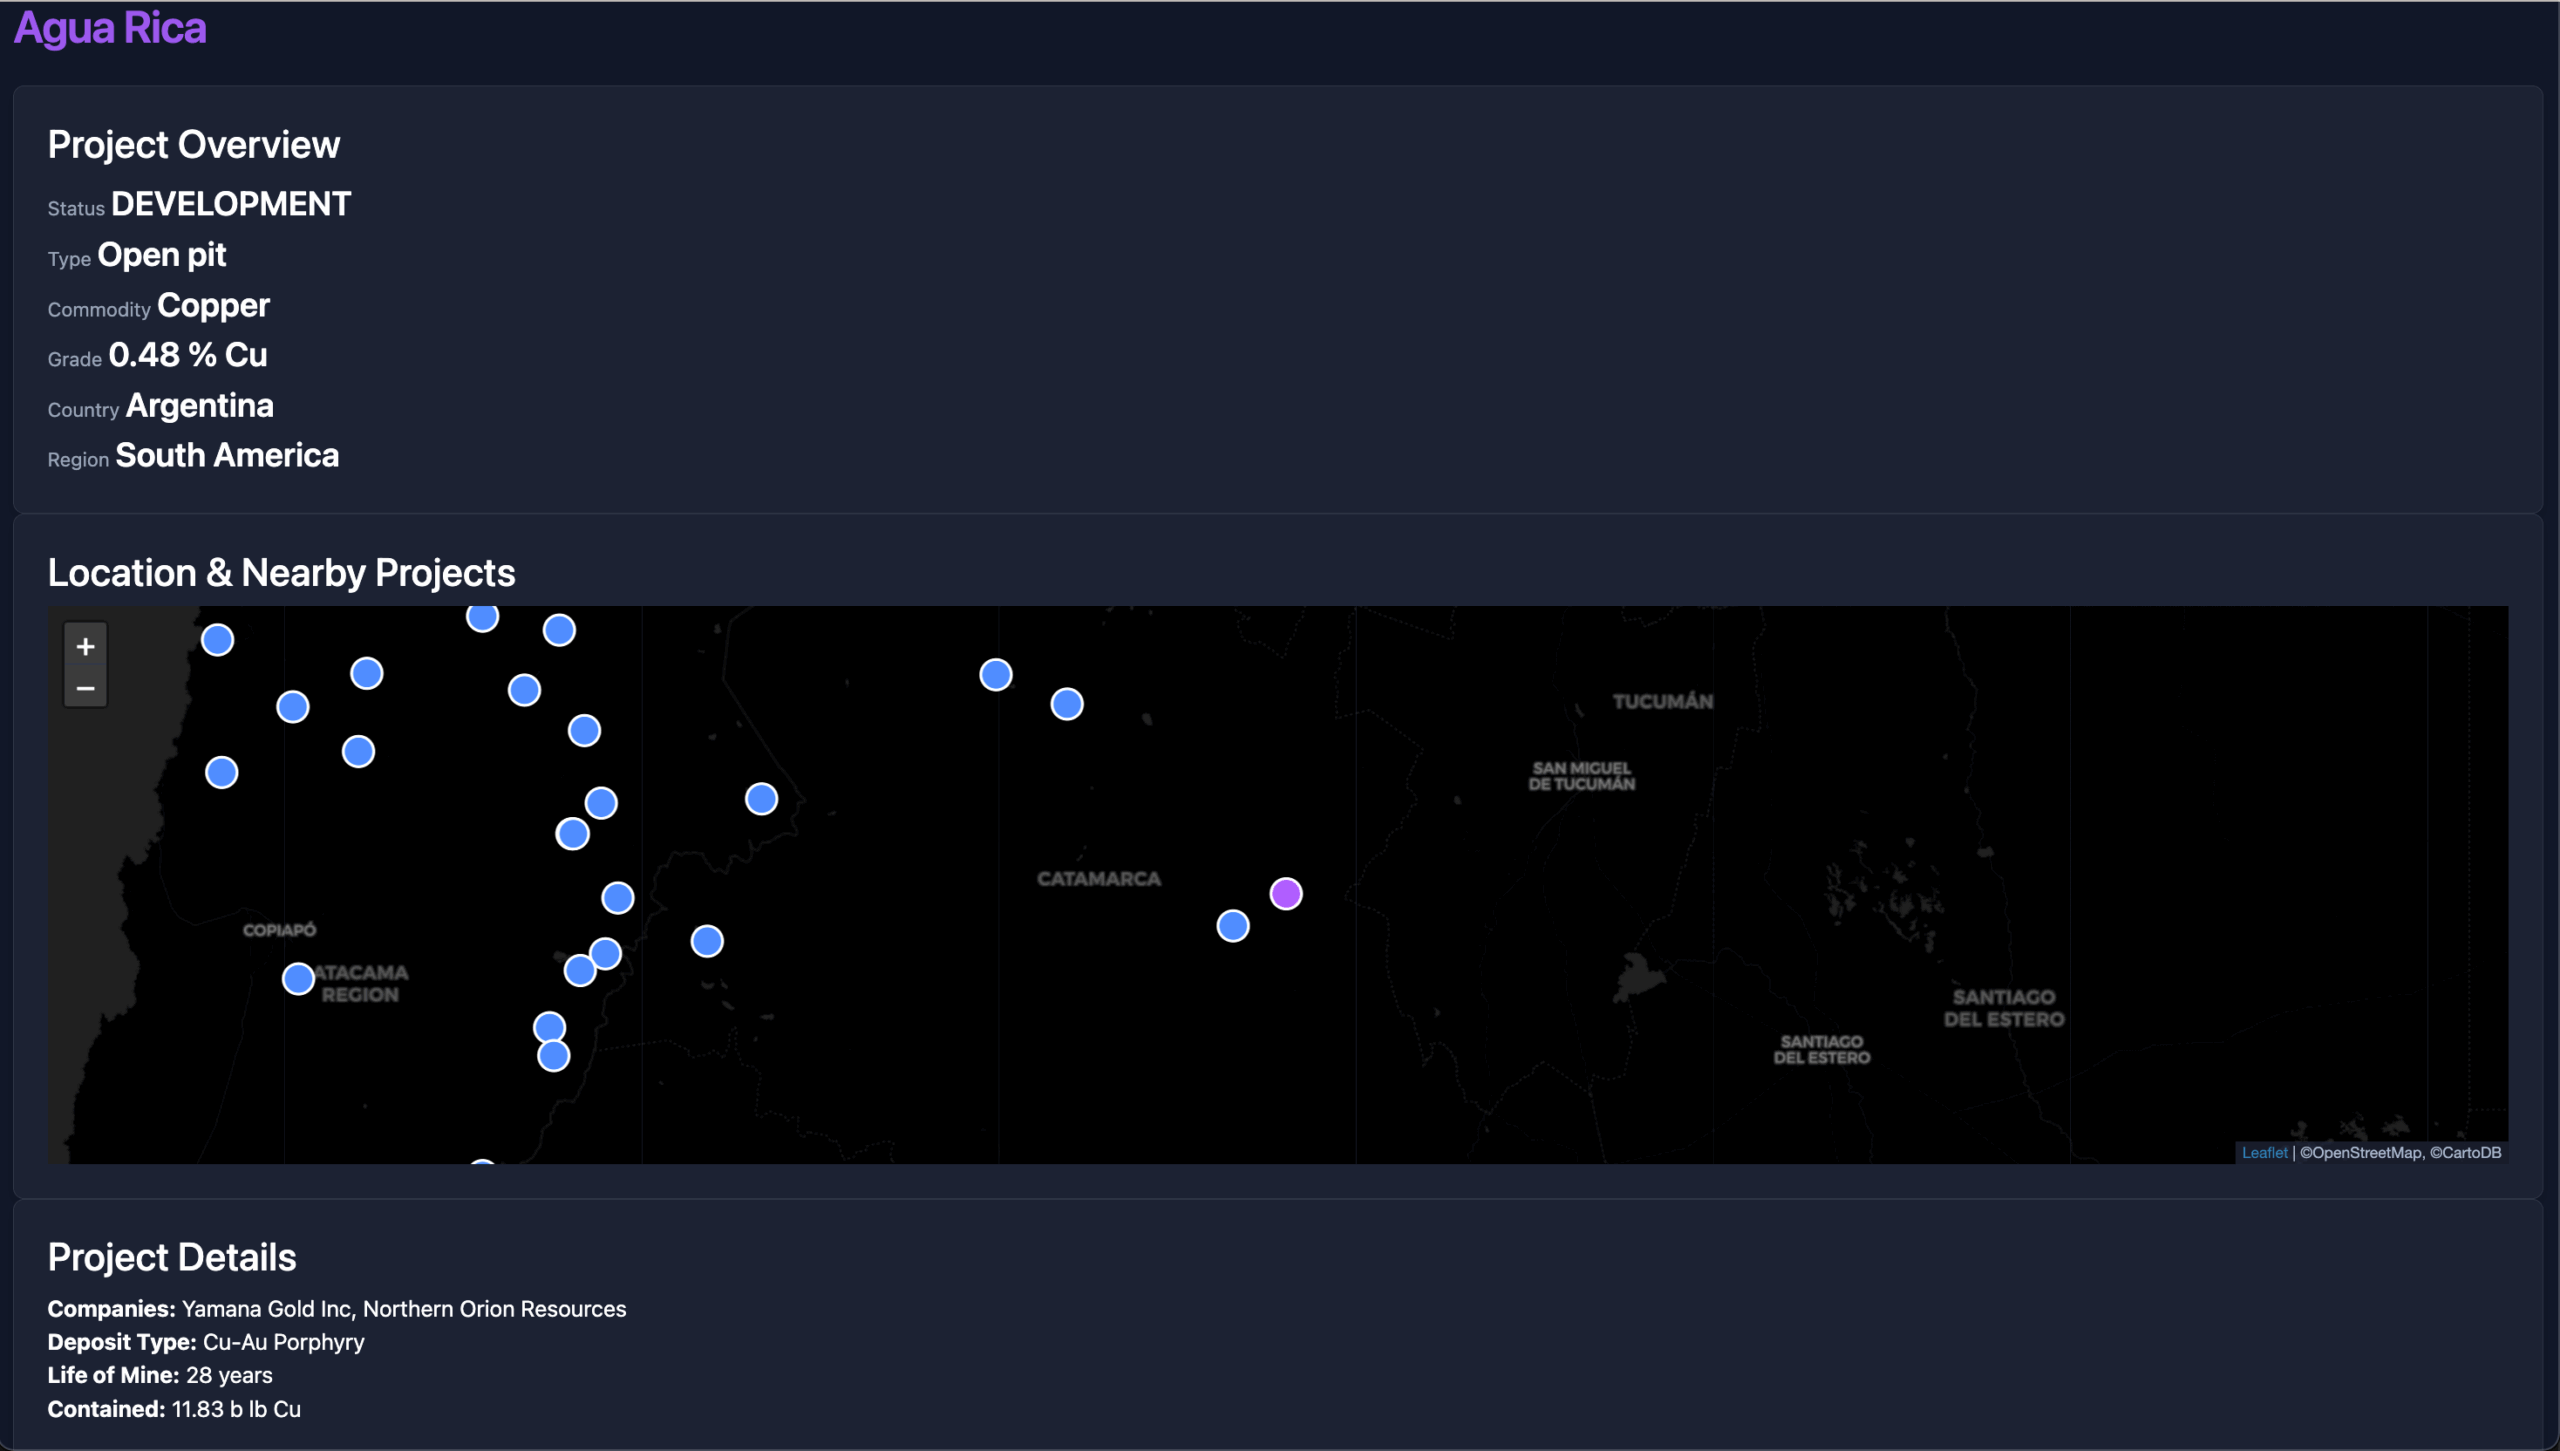
    Project Details

    Project Details Detailed view of individual projects including location mapping and nearby operations

    Features

    • 📊 Interactive data table of mining projects
    • 🗺️ Geographic visualization of project locations
    • 📈 Analytics dashboard with industry insights
    • 🔍 Detailed project views with nearby operations
    • 🌐 REST API endpoints for data access

    Tech Stack

    • Backend: FastAPI, Python 3.8+
    • Frontend: JavaScript, HTML5, CSS3
    • Data Handling: Pydantic
    • Templates: Jinja2
    • API Integration: Requests

    Installation

    1. Clone the repository:

      git clone https://github.com/TomAllsop/Mining-Data-Viewer.git
      cd Mining-Data-Viewer
    2. Create a virtual environment:

      python -m venv venv
      source venv/bin/activate  # On Windows: venv\Scripts\activate
    3. Install dependencies:

      pip install -r requirements.txt
    4. Run the application:

      uvicorn digbee_list_projects:app --reload

      OR

    The application will be available at http://localhost:8000 or http://0.0.0.0:8000

    API Endpoints

    Endpoint Method Description
    /api/mining-data GET Retrieve all mining projects
    /api/nearby-projects/{project_id} GET Get projects within 500km radius

    Project Structure

    Mining-Data-Viewer/
    ├── digbee_list_projects.py   # Main application file
    ├── static/                   # Static assets
    │   ├── project-dashboard.js
    │   └── datatables-custom.css
    ├── templates/               # HTML templates
    │   ├── index.html
    │   ├── analytics.html
    │   └── project_dashboard.html
    └── requirements.txt        # Project dependencies
    

    Contributing

    1. Fork the repository
    2. Create a feature branch (git checkout -b feature/AmazingFeature)
    3. Commit your changes (git commit -m 'Add some AmazingFeature')
    4. Push to the branch (git push origin feature/AmazingFeature)
    5. Open a Pull Request

    License

    This project is licensed under the MIT License – see the LICENSE file for details.

    Acknowledgments

    Visit original content creator repository https://github.com/TomAllsop/Mining-Data-Viewer
  • Elmish.WPF

    WPF done the Elmish Way

    NuGet version NuGet downloads Build status

    The good parts of MVVM (the data bindings) with the simplicity and robustness of an MVU architecture for the rest of your app. Never write an overly-complex ViewModel class again!

    Elevator pitch

    Elmish.WPF is a production-ready library that allows you to write WPF apps with the robust, simple, well-known, and battle-tested MVU architecture, while still allowing you to use all your XAML knowledge and tooling to create UIs.

    Some benefits of MVU you’ll get with Elmish.WPF include:

    • Simple-to-understand, unidirectional data flow
    • Single source of truth for all the state in your app
    • Simple async/IO
    • Immutable data
    • Pure functions
    • Great testability
    • Simple optimization
    • 78% more rockets 🚀

    Even with static views, your central model/update code can follow an idiomatic Elmish/MVU architecture. You could, if you wanted, use the same model/update code to implement an app using a dynamic UI library such as Fabulous or Fable.React, by just rewriting the “U” part of MVU.

    Static XAML views is a feature, not a limitation. See the FAQ for several unique benefits to this approach!

    Elmish.WPF uses Elmish, an F# implementation of the MVU message loop.

    Big thanks to @MrMattSim for the wonderful logo!

    Sponsor

    JetBrains logo

    Thanks to JetBrains for sponsoring Elmish.WPF with OSS licenses!

    Recommended resources

    Getting started with Elmish.WPF

    See the SingleCounter sample for a very simple app. The central points are (assuming up-to-date VS2019):

    1. Create an F# Class Library. If targeting .NET 5 or .NET Core, the project file should look like this:

      <Project Sdk="Microsoft.NET.Sdk.WindowsDesktop">
    2. Add NuGet reference to package Elmish.WPF.

    3. Define the model that describes your app’s state and a function that initializes it:

      type Model =
        { Count: int
          StepSize: int }
      
      let init () =
        { Count = 0
          StepSize = 1 }
    4. Define the various messages that can change your model:

      type Msg =
        | Increment
        | Decrement
        | SetStepSize of int
    5. Define an update function that takes a message and a model and returns an updated model:

      let update msg m =
        match msg with
        | Increment -> { m with Count = m.Count + m.StepSize }
        | Decrement -> { m with Count = m.Count - m.StepSize }
        | SetStepSize x -> { m with StepSize = x }
    6. Define the “view” function using the Bindings module. This is the central public API of Elmish.WPF.

      Normally in Elm/Elmish this function is called view and would take a model and a dispatch function (to dispatch new messages to the update loop) and return the UI (e.g. a HTML DOM to be rendered), but in Elmish.WPF this function is in general only run once and simply sets up bindings that XAML-defined views can use. Therefore, let’s call it bindings instead of view.

      open Elmish.WPF
      
      let bindings () =
        [
          "CounterValue" |> Binding.oneWay (fun m -> m.Count)
          "Increment" |> Binding.cmd (fun m -> Increment)
          "Decrement" |> Binding.cmd (fun m -> Decrement)
          "StepSize" |> Binding.twoWay(
            (fun m -> float m.StepSize),
            (fun newVal m -> int newVal |> SetStepSize))
        ]

      The strings identify the binding names to be used in the XAML views. The Binding module has many functions to create various types of bindings.

      Alternatively, use statically-typed view models in order to get better IDE support in the XAML.

      open Elmish.WPF
      
      type CounterViewModel(args) =
        inherit ViewModelBase<Model, Msg>(args)
      
        member _.CounterValue = base.Get() (Binding.OneWayT.id >> Binding.mapModel (fun m -> m.Count))
        member _.Increment = base.Get() (Binding.CmdT.setAlways Counter.Increment)
        member _.Decrement = base.Get() (Binding.CmdT.setAlways Counter.Decrement)
        member _.StepSize
          with get() = base.Get() (Binding.OneWayT.id >> Binding.mapModel (fun m -> m.StepSize))
          and set(v) = base.Set(v) (Binding.OneWayToSourceT.id >> Binding.mapMsg Counter.Msg.SetStepSize)
    7. Create a function that accepts the app’s main window (to be created) and configures and starts the Elmish loop for the window with your init, update and bindings:

      open Elmish.WPF
      
      let main window =
        Program.mkSimple init update bindings
        |> Program.runElmishLoop window

      Alternatively, use a statically-typed view model at the top level.

      open Elmish.WPF
      
      let main window =
        Program.mkSimpleT init update CounterViewModel
        |> Program.runElmishLoop window

      In the code above, Program.runElmishLoop will set the window’s DataContext to the specified bindings and start the Elmish dispatch loop for the window.

    8. Create a WPF app project (using the Visual Studio template called WPF App (.NET)). This will be your entry point and contain the XAML views. Add a reference to the F# project, and make the following changes in the csproj file:

      • Currently, the core Elmish logs are only output to the console. If you want a console window for displaying Elmish logs, change <OutputType>WinExe</OutputType> to <OutputType>Exe</OutputType> and add <DisableWinExeOutputInference>true</DisableWinExeOutputInference>.
      • If the project file starts with the now legacy <Project Sdk="Microsoft.NET.Sdk.WindowsDesktop">, change it to <Project Sdk="Microsoft.NET.Sdk">
      • Change the target framework to match the one used in the F# project (e.g. net5.0-windows).

      Make the following changes to App.xaml.cs to initialize Elmish when the app starts:

      public partial class App : Application
      {
        public App()
        {
          this.Activated += StartElmish;
        }
      
        private void StartElmish(object sender, EventArgs e)
        {
          this.Activated -= StartElmish;
          Program.main(MainWindow);
        }
      
      }
    9. Define your views and bindings in XAML:

      <Window
          x:Class="MyNamespace.MainWindow"
          xmlns="http://schemas.microsoft.com/winfx/2006/xaml/presentation"
          xmlns:x="http://schemas.microsoft.com/winfx/2006/xaml">
        <StackPanel Orientation="Horizontal">
          <TextBlock Text="{Binding CounterValue}" />
          <Button Command="{Binding Decrement}" Content="-" />
          <Button Command="{Binding Increment}" Content="+" />
          <TextBlock Text="{Binding StepSize}" />
          <Slider Value="{Binding StepSize}" TickFrequency="1" Minimum="1" Maximum="10" />
        </StackPanel>
      </Window>
    10. Profit! 🙂

    Further resources:

    • The Elmish.WPF tutorial provides information on general MVU/Elmish concepts and how they apply to Elmish.WPF, as well as the various Elmish.WPF bindings.
    • The samples are complete, working mini-apps demonstrating selected aspects of Elmish.WPF.
    • If you’d like to contribute, please read and follow the Contributor guidelines.

    FAQ

    Static views in MVU? Isn’t that just a half-baked solution that only exists due to a lack of better alternatives?

    Not at all! 🙂

    It’s true that static views aren’t as composable as dynamic views. It’s also true that at the time of writing, there are no solid, production-ready dynamic UI libraries for WPF (though there are no lack of half-finished attempts or proof-of-concepts: Elmish.WPF.Dynamic, Fabulous.WPF, Skylight, Uil). Heck, it’s even true that Elmish.WPF was originally created with static views due to the difficulty of creating a dynamic UI library, as described in issue #1.

    However, Elmish.WPF’s static-view-based solution has several unique benefits:

    • You can use your existing XAML and MVVM knowledge (that is, the best part of MVVM – the UI bindings – without having to deal with NavigationServices, ViewModelLocators, state synchronization, INotifyPropertyChanged, etc.)
    • Huge mindshare – there are tons of relevant XAML and MVVM resources on the net which can help with the UI and data binding part if you get stuck
    • Automatic support for all 3rd party WPF UI libraries like MaterialDesignInXamlToolkit, since it just uses XAML and bindings (support for 3rd party libraries is commonly a major pain point for dynamic UI solutions)
    • You can use the XAML designer (including design-time data binding)
    • Automatically puts all the power of WPF at your fingertips, whereas dynamic UI solutions have inherent limitations that are not easy to work around

    In short, for WPF apps, a solution based on static XAML views is currently the way to go.

    Do I have to use the project structure outlined above?

    Not at all. The above example, as well as the samples, keep all non-UI code in a single project for simplicity, and all the XAML in a C# project for better tooling.

    An alternative with a clearer separation of UI and core logic can be implemented by splitting the F# project into two projects:

    • A core library containing the model definitions and update functions.
      • This library can include a reference to Elmish (e.g. for the Cmd module helpers), but not to Elmish.WPF, which depends on WPF and has a UI-centered API (specifying bindings). This will ensure your core logic (such as the update function) is free from any UI concerns, and allow you to re-use the core library should you want to port your app to another Elmish-based solution (e.g. Fable.React).
    • An Elmish.WPF project that contains the bindings (or view) function and the call to Program.runElmishLoop.
      • This project would reference the core library and Elmish.WPF.

    Another alternative is to turn the sample code on its head and have the F# project be a console app containing your entry point (with a call to Program.runWindow) and referencing the C#/XAML project (instead of the other way around, as demonstrated above).

    In general, you have a large amount of freedom in how you structure your solution and what kind of entry point you use.

    How can I test commands? What is the CmdMsg pattern?

    Since the commands (Cmd<Msg>) returned by init and update are lists of functions, they are not particularly testable. A general pattern to get around this is to replace the commands with pure data that are transformed to the actual commands elsewhere:

    • Create a CmdMsg union type with cases for each command you want to execute in the app.
    • Make init and update return model * CmdMsg list instead of model * Cmd<Msg>. Since init and update now return data, they are much easier to test.
    • Create a trivial/too-boring-to-test cmdMsgToCmd function that transforms a CmdMsg to the corresponding Cmd.
    • Finally, create “normal” versions of init and update that you can use when creating Program. Elmish.WPF provides Program.mkProgramWpfWithCmdMsg that does this for you (but there’s no magic going on – it’s really easy to do yourself).

    The FileDialogsCmdMsg sample demonstrates this approach. For more information, see the Fabulous documentation. For reference, here is the discussion that led to this pattern.

    Can I use design-time view models?

    Yes. Assuming you have a C# XAML and entry point project referencing the F# project, simply use ViewModel.designInstance (e.g. in the F# project) to create a view model instance that your XAML can use at design-time:

    module MyAssembly.DesignViewModels
    let myVm = ViewModel.designInstance myModel myBindings

    Then use the following attributes wherever you need a design-time VM:

    <Window
        ...
        xmlns:d="http://schemas.microsoft.com/expression/blend/2008"
        xmlns:mc="http://schemas.openxmlformats.org/markup-compatibility/2006"
        xmlns:vm="clr-namespace:MyAssembly;assembly=MyAssembly"
        mc:Ignorable="d"
        d:DataContext="{x:Static vm:DesignViewModels.myVm}">

    When targeting legacy .NET Framework, “Project code” must be enabled in the XAML designer for this to work.

    If you are using static view models, make sure that the View Model type is in a namespace and add a default constructor that passes a model into ViewModelArgs.simple:

    namespace ViewModels
    
    type [<AllowNullLiteral>] AppViewModel (args) =
      inherit ViewModelBase<AppModel, AppMsg>(args)
      
      new() = AppViewModel(App.init () |> ViewModelArgs.simple)

    Then use the following attributes just like you would in a normal C# MVVM project:

    <Window
        ...
        xmlns:d="http://schemas.microsoft.com/expression/blend/2008"
        xmlns:mc="http://schemas.openxmlformats.org/markup-compatibility/2006"
        xmlns:vm="clr-namespace:ViewModels.SubModelStatic;assembly=MyAssembly"
        mc:Ignorable="d"
        d:DataContext="{d:DesignInstance Type=vm:AppViewModel, IsDesignTimeCreatable=True}">
    .NET Core 3 workaround

    When targeting .NET Core 3, a bug in the XAML designer causes design-time data to not be displayed through DataContext bindings. See this issue for details. One workaround is to add a d:DataContext binding alongside your normal DataContext binding. Another workaround is to change

    <local:MyControl DataContext="{Binding Child}" />

    to

    <local:MyControl
      DataContext="{Binding Child}"
      d:DataContext="{Binding DataContext.Child,
                              RelativeSource={RelativeSource AncestorType=T}}" />

    where T is the type of the parent object that contains local:MyControl (or a more distant ancestor, though there are issues with using Window as the type).

    Can I open new windows/dialogs?

    Sure! Just use Binding.subModelWin. It works like Binding.subModel, but has a WindowState wrapper around the returned model to control whether the window is closed, hidden, or visible. You can use both modal and non-modal windows/dialogs, and everything is a part of the Elmish core loop. Check out the NewWindow sample.

    Note that if you use App.xaml startup, you may want to set ShutdownMode="OnMainWindowClose" in App.xaml if that’s the desired behavior.

    Can I bind to events and use behaviors?

    Sure! Check out the EventBindingsAndBehaviors sample. Note that you have to install the NuGet package Microsoft.Xaml.Behaviors.Wpf.

    How can I control logging?

    Elmish.WPF uses Microsoft.Extensions.Logging. To see Elmish.WPF output in your favorite logging framework, use WpfProgram.withLogger to pass an ILoggerFactory:

    WpfProgram.mkSimple init update bindings
    |> WpfProgram.withLogger yourLoggerFactory
    |> WpfProgram.runWindow window

    For example, in Serilog, you need to install Serilog.Extensions.Logging and instantiate SerilogLoggerFactory. The samples demonstrate this.

    Elmish.WPF logs to these categories:

    • Elmish.WPF.Update: Logs exceptions (Error level) and messages/models (Trace/Verbose level) during update.
    • Elmish.WPF.Bindings: Logs events related to bindings. Some logging is done at the Error level (e.g. developer errors such as duplicated binding names, using non-existent bindings in XAML, etc.), but otherwise it’s generally just Trace/Verbose for when you really want to see everything that’s happening (triggering PropertyChanged, WPF getting/setting bindings, etc.)
    • Elmish.WPF.Performance: Logs the performance of the functions you pass when creating bindings (get, set, map, equals, etc.) at the Trace/Verbose level. Use WpfProgram.withPerformanceLogThreshold to set the minimum duration to log.

    The specific method of controlling what Elmish.WPF logs depends on your logging framework. For Serilog you can use .MinimumLevel.Override(...) to specify the minimum log level per category, like this:

    myLoggerConfiguration
      .MinimumLevel.Override("Elmish.WPF.Bindings", LogEventLevel.Verbose)
      ...
    Visit original content creator repository https://github.com/elmish/Elmish.WPF