Category: Blog

  • AutoDailyReport-For-USTC

    USTC健康打卡平台自动打卡脚本

    Auto-report action Language GitHub stars GitHub forks

    说明

    本打卡脚本仅供学习交流使用,请勿过分依赖。开发者对使用或不使用本脚本造成的问题不负任何责任,不对脚本执行效果做出任何担保,原则上不提供任何形式的技术支持。

    本仓库基于原版,参考修改版并进行修改,增加对出校申请和跨校区报备的支持。目前正持续更新以尽量使得每一天都可以自动打卡,愿完全放开的日子早日到来。

    更新记录

    • 20220407: 本人基于之前的脚本,并进行修改以适应现在的打卡版本
    • 20220408: 在SECRET中增加是否执行操作的选项,以适应更多需求
    • 20220421: 增加每日上传两码功能
    • 20220506: 恭喜解封,源代码可用,但增加每日出校报备
    • 20220509: 解决打卡系统post链接被修改,上传两码需要GID的问题
    • 20220510: 解决上传两码需要sign的问题
    • 20220513: 恭喜自动授权安康码,不再需要自动上传安康码
    • 20220706: 增加对于不在校等状态的支持,可能有bug
    • 20220829: 风头较严,进出校需要人工审核,建议只进行报备和上传行程码
    • 20220830: 增加每日对于申请审核跨校区的支持
    • 20220909: 再次恭喜解封,并启用原功能
    • 20221007: 完善进出校申请和报备的切换,以及行程码上传方法
    • 20221018: 出校报备需要两次核酸报告,需要手动上传
    • 20221022: 现在申请也过不了,傻逼封控,暂停申请
    • 20221107: 再次恭喜解封,并启用原功能
    • 20221128: 根据新要求,只能在20点之后报备下一天,更改报备时间
    • 20230226: 恭喜全面解封,感谢大家支持,脚本停止运行,愿它永不启用

    使用方法

    写在前面:请在自己fork的仓库中修改,并push到自己的仓库,不要直接修改本仓库,也不要将您的修改pull request到本仓库(对本仓库的改进除外)!如果尚不了解github的基本使用方法,请参阅使用议题和拉取请求进行协作/使用复刻使用议题和拉取请求进行协作/通过拉取请求提议工作更改

    可根据使用视频: Bilibili进行使用。或者可以按照如下步骤操作:

    1. 将本代码仓库fork到自己的github,并授权打卡系统从权威机构获取安康码信息。

    2. 根据自己的实际情况修改runme.py中的前40行数据。

    3. 将修改好的代码提交到自己的仓库。

    4. 点击Actions选项卡,点击I understand my workflows, go ahead and enable them.

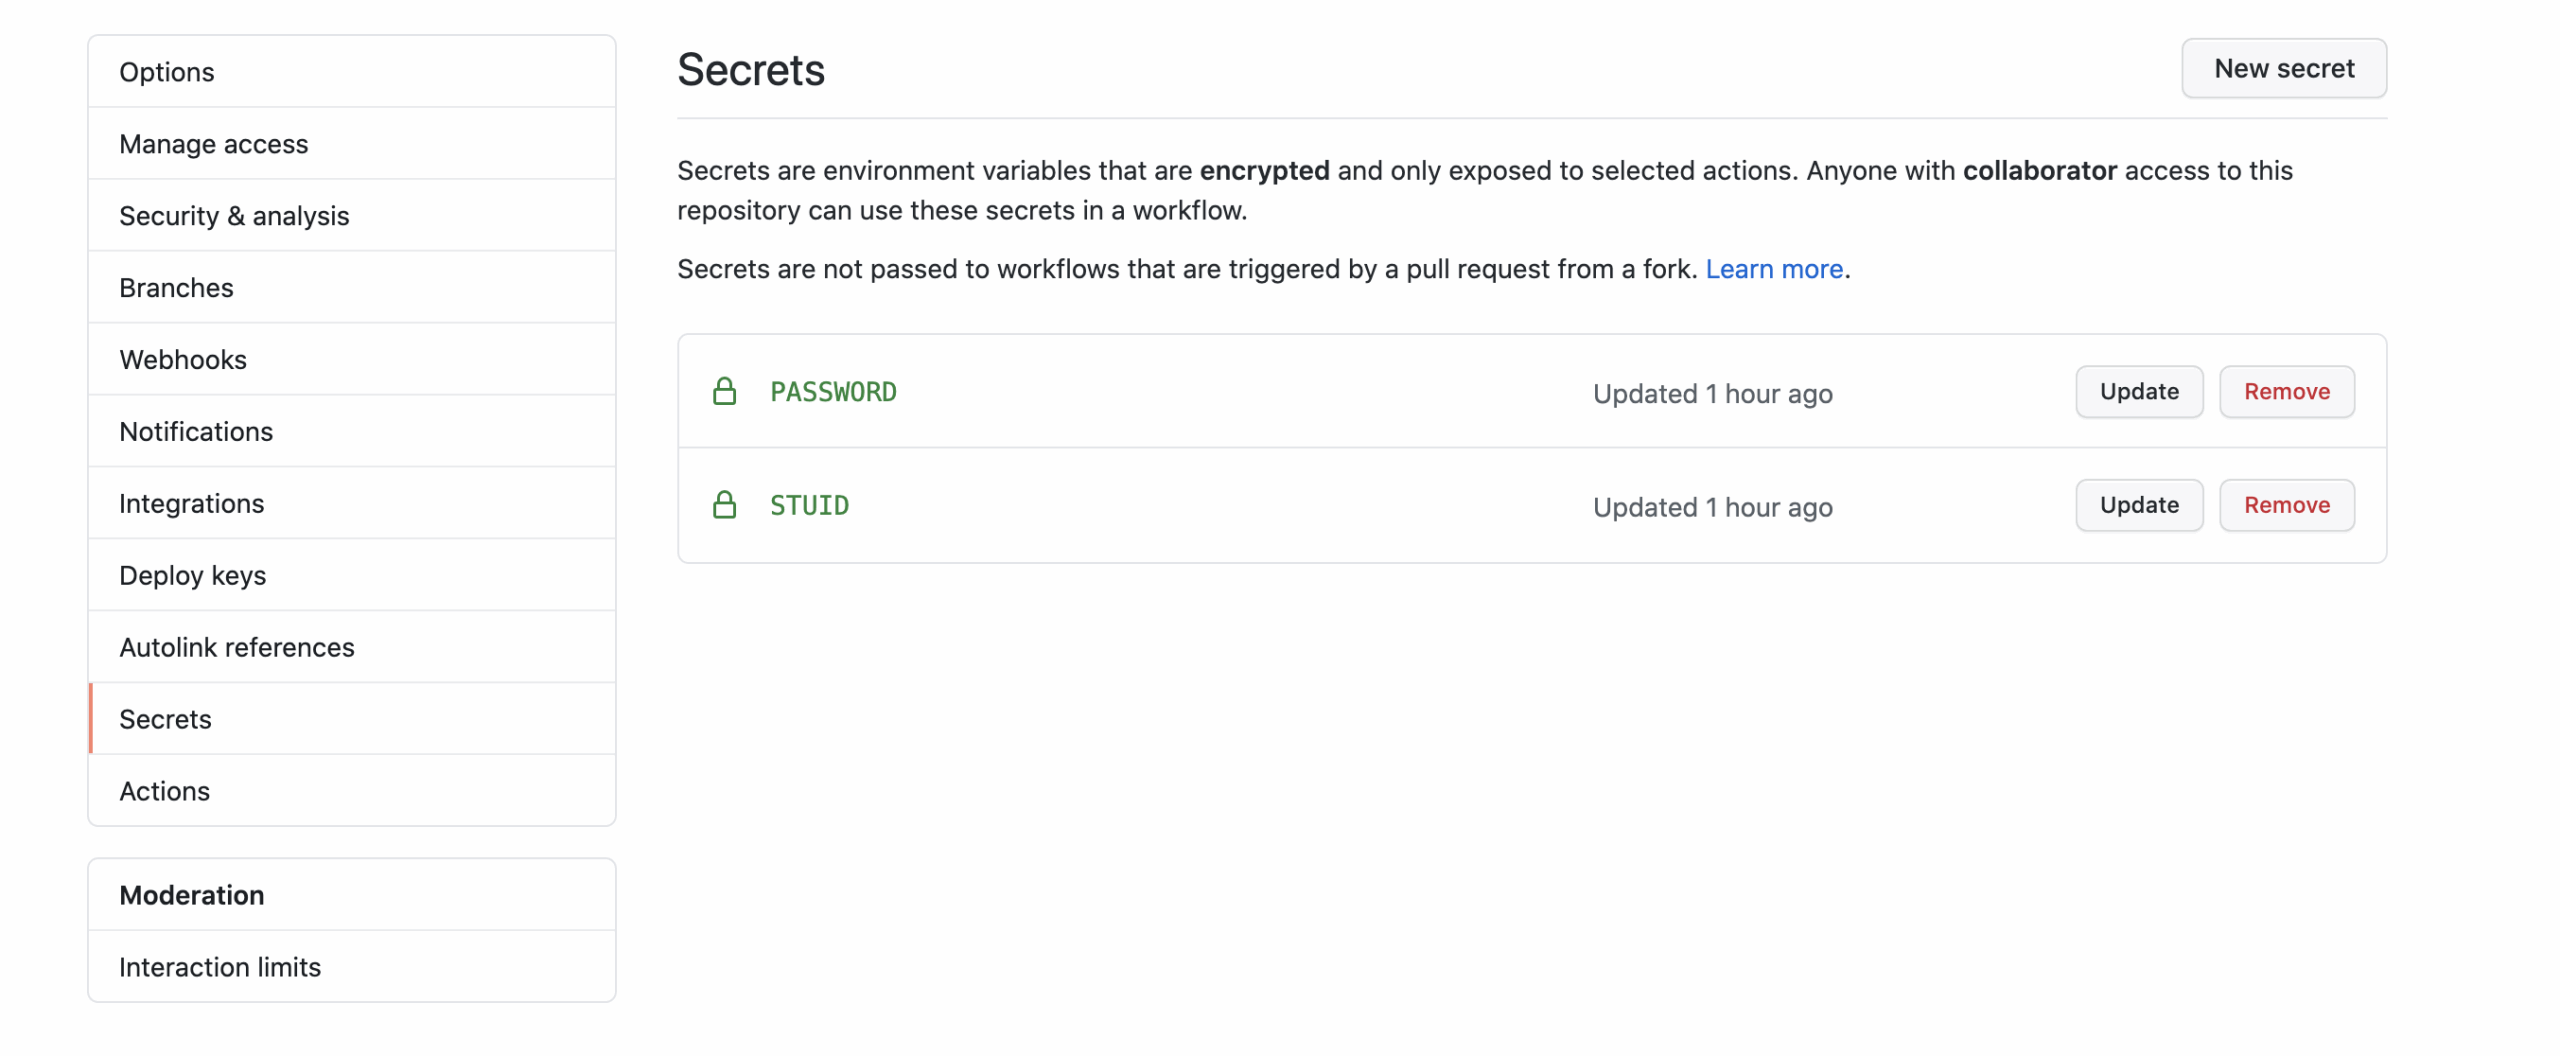
    5. 点击Settings选项卡,点击左侧Secrets,点击New secret,创建名为STUID,值为自己学号的secret。用同样方法,创建名为PASSWORD,值为自己统一身份认证密码的secret。以上数据不会被公开。

      secrets

    6. 默认的打卡时间是每天的上午7:10(建议5点之后,因为5点才会同步安康码),可能会有(延后)几十分钟的浮动。如需选择其它时间,可以修改.github/workflows/report.yml中的cron,详细说明参见安排的事件,请注意这里使用的是国际标准时间UTC,北京时间的数值比它大8个小时。建议修改默认时间,避开打卡高峰期以提高成功率。

    7. 在Actions选项卡可以确认打卡情况。如果打卡失败(可能是临时网络问题等原因),脚本会自动重试,五次尝试后如果依然失败,将返回非零值提示构建失败。

    8. 在Github个人设置页面的Notifications下可以设置Github Actions的通知,建议打开Email通知,并勾选”Send notifications for failed workflows only”。请及时查看邮件,如果失败会进行通知。

    9. 如果觉得这个仓库对你有用的话,给个星星✨吧~

    在本地运行测试

    要在本地运行测试,需要安装python 3。我们假设您已经安装了python 3和pip 3,并已将其路径添加到环境变量。

    安装依赖

    pip install -r requirements.txt

    运行打卡程序

    python runme.py [STUID] [PASSWORD]

    其中,[STUID]是学号,[PASSWORD]是统一身份认证的密码明文,剩下三个参数为是否出校报备、是否跨校区报备、是否每日打卡,默认不出校,跨校区,打卡。如

    python runme.py "PB19890604" "FREEDOM"
    Visit original content creator repository https://github.com/cyzkrau/AutoDailyReport-For-USTC
  • caulking

    Visit original content creator repository
    https://github.com/barrylustig/caulking

  • SoftwareDevelopment

    Programming languages

    .NET C#

    Frameworks

    Technologies

    Libraries

    • DotNetZip – is a FAST, FREE class library and toolset for manipulating zip files. Use VB, C# or any .NET language to easily create, extract, or update zip files.
    • MailKit – is a cross-platform mail client library built on top of MimeKit.

    Links

    Elm

    Elm is a domain-specific programming language for declaratively creating web browser-based graphical user interfaces.

    • Elmish.Net – Elm architecture for .NET apps. 100% less XAML.
    • caefte – C# And Elm For Tiny Executables

    Cross-platform frameworks

    Xamarin

    User Interface (UI)

    Frameworks

    • FreshMvvm – is a super light Mvvm Framework designed specifically for Xamarin.Forms. It’s designed to be Easy, Simple and Flexible.

    Praxis

    Links

    Apache Cordova

    Ionic

    React Native

    Flutter

    Other

    Version-control systems

    Job/Interview

    Games

    Blogs

    Visit original content creator repository
    https://github.com/NikoNenov/SoftwareDevelopment

  • vit-visualization

    Visit original content creator repository
    https://github.com/zer0int/vit-visualization

  • shared_mustache

    SharedMustache

    Add the ability to share mustache templates in Rails and
    JavaScript.

    Mustache templates will be rendered using Ruby mustache on the server.

    On the client there is a jQuery helper to let you use the template. In
    development the templates are outputted on the page in script blocks. For
    production the templates are compiled using hogan.js, the compiled
    templates can then be included into your standard JavaScript file using the
    asset-pipeline.

    Installation

    Add ‘shared_mustache’ to your your application’s Gemfile.

    By default when you run rake shared_mustache:compile it will put the outputed
    templates JavaScript at Rails.root/app/assets/javascript/templates.js. This
    can be configured using an intializer. The templates.js file should be kept
    empty for development and only populated in production.

    You should add the following lines to your application.js:

    //= require shared_mustache
    //= require templates
    

    This adds the jQuery helper for you to use the templates and in production will
    add the compiled templates.

    At the bottom of your main layout you should add:

    <%= render_mustache_templates if Rails.env.development? %>
    

    Add rake shared_mustache:compile before the assets:precompile step of your
    deploy script.

    Currently it expects your views to be found under app/views.

    Usage

    Create mustache templates as you would erb partials. So for example at
    app/views/home/_row.mustache. You can then render it in an erb template
    using:

    <%= render_mustache('home/row', context) %>
    

    It tries to use the same conventions as the native render methods. Such that
    you can ommit the controller if the mustache is in the same folder as the
    currently executing controller.

    In your JavaScript you should get access to jQuery methods to interact with the
    mustache templates:

    $.mustache('home/_row', context);
    

    Visit original content creator repository
    https://github.com/alphagov/shared_mustache

  • mysql-dbms-projects

    MySQL-RDBMS-Projects | MySQL Logic Practice Repository

    Welcome to my SQL Practice + Projects Repository! This repository contains a variety of SQL files that cover essential SQL concepts, designed to aid in mastering database management and querying techniques. Each file contains example code, explanations, and exercises to reinforce SQL knowledge.

    Table of Contents

    1. 1-ecommerce

    2. 2-database-structures-management-with-mysql

    3. **ADVANCED MYSQL Topics **

    4. 4-python-testing-tools

    5. Practice Projects

    6. SQL Query Exercises

    7. Resources

      • Links to Additional SQL Learning Resources

    Getting Started

    1. Clone this repository:
      git clone https://github.com/prantomollick/mysql-dbms-projects

    Visit original content creator repository
    https://github.com/prantomollick/mysql-dbms-projects

  • mum

    Build Status Maintainability Test Coverage

    MUM – Mailserver User Management

    ️️⚠️ ATTENTION 🧨

    This software is still in development and not production-ready. Help us make it better by contributing!

    Documentation

    The up-to-date version of the documentation is hosted right here. The docs repository is tagged using MUM’s version numbers, so you may access older documentation simply by downloading the corresponding documentation version and building the static site yourself.

    About the Project

    Since there weren’t any good web-based user management tools for Postfix and Dovecot out there, we decided to build our own. MUM originated as a software development project at Stuttgart Media University.

    Migration

    Coming from another mailbox administration software? Maybe you want to have a look at MUM Migrator. Our console migration tool moves your data in a matter of minutes and allows you to focus on the important things.

    Contributing

    You want to help? Awesome! Have a look at the Contribution Guide and start coding.

    Security

    If you discover any security vulnerabilities, please send an email to mum-project@mnbo.de.

    License

    The MIT license. Please see the license file for more information.

    Copyright © 2018-2021 Martin Bock, Max Merz.

    Visit original content creator repository https://github.com/mum-project/mum
  • cojiro

    cojiro

    Nintendo JoyBus device designs for the iCEBreaker FPGA development board.

    Features

    • Simulate a Nintendo 64 controller with ephemeral Controller Pak memory
    • Simulate a Pokémon Snap Station
    • Host mode for controlling devices over USB (send/receive data through the Joy Bus connection)
      • Poll controller button states
      • Dump data from a Controller Pak
      • Use a Transfer Pak for Gameboy cartridge I/O

    Setup

    Install the IceStorm toolchain: see http://bygone.clairexen.net/icestorm/

    Clone repository and submodules:

    $ git clone https://github.com/jamchamb/cojiro.git
    $ cd cojiro
    $ git submodule update --init

    Build and flash the basic N64 controller design:

    $ make prog

    Build and flash the Snap Station design:

    $ make prog_snap

    Hardware setup

    iCEBreaker I/O

    • PMOD1A is used for simple state or debug output on the seven-segment display module
    • PMOD1B is used for the JoyBus I/O (pin P1B1) and ground
    • PMOD2 is used for the button module
    • USB is used for UART (baud rate is 1500000, use software/uart_sniff.py for sniffing traffic)
    • uButton is used to reset the overall state of the device

    Console or controller connection

    For the Nintendo 64 cable, buy a controller extension cord and cut it in half. One end can be used to connect the iCEBreaker to the console, the other end can be used to receive a controller. Attach the ground line to a ground on PMOD1B, data line to pin P1B1, and place a pull-up resistor between the 3.3V power line and the data line (I used a 330 Ohm resistor here). When receiving a controller, connect a 3.3V out from the iCEBreaker to the power line.

    Designs

    Controller

    The controller design uses buttons 3, 2, and 1 for A, B, and Start. It also has a Controller Pak built-in, but currently the memory only exists in RAM. Using the SPI flash to persist the pak data is a to-do.

    Snap Station

    Implements the Snap Station protocol used by Pokémon Snap and Pokémon Stadium. See https://jamchamb.net/2021/08/17/snap-station.html for an overview.

    Press button 1 to advance the state of the Snap Station.

    1. After entering the main menu or Gallery menu, press BTN1 once to enable the station.
    2. Press Print in the Gallery menu.
    3. After the “Now Saving…” message appears, reset the console.
    4. Press BTN1 to advance through the photo display until all 16 photos are displayed.

    See here for a video demo.

    Host mode UART control

    With this design the iCEBreaker acts as a UART bridge between a host computer and a Joy Bus device. This allows the host to send commands to a device such as an N64 controller as if it were the console. See software/uart_host.py.

    Example of dumping Controller Pak memory

    $ ./uart_host.py /dev/ttyUSB1 --dump-cpak cpak_gray.bin
    Using port: /dev/ttyUSB1
    Pad type: 0005, joyport status: 01
    dump controller pak to cpak_gray.bin...
    100%|███████████████████████████████████████████████| 1024/1024 [00:16<00:00, 62.55it/s]
    $ hexdump cpak_gray.bin | head
    000000 81 fe fd fc fb fa f9 f8 00 fe fd fc 08 08 08 08  >................<
    000010 ef ee ed ec 00 00 00 15 10 ee ed ec f5 00 00 f4  >................<
    000020 ff ff ff ff 04 bc 62 75 05 4c 46 f2 07 87 27 07  >......bu.LF...'.<
    000030 00 00 00 00 4f 4b 4b 0a 00 01 01 00 7d 51 82 a1  >....OKK.....}Q..<
    000040 00 00 00 00 00 00 00 00 00 00 00 00 00 00 00 00  >................<
    *
    000060 ff ff ff ff 04 bc 62 75 05 4c 46 f2 07 87 27 07  >......bu.LF...'.<
    000070 00 00 00 00 4f 4b 4b 0a 00 01 01 00 7d 51 82 a1  >....OKK.....}Q..<
    000080 ff ff ff ff 04 bc 62 75 05 4c 46 f2 07 87 27 07  >......bu.LF...'.<
    000090 00 00 00 00 4f 4b 4b 0a 00 01 01 00 7d 51 82 a1  >....OKK.....}Q..<

    Example of dumping Game Boy cartridge RAM with a Transfer Pak

    $ ./uart_host.py /dev/ttyUSB1 --dump-tpak-ram pokemon_blue.sav
    Using port: /dev/ttyUSB1
    Pad type: 0005, joyport status: 01
    transfer pak present: True
    ROM header:
    00000000: 00 C3 50 01 CE ED 66 66  CC 0D 00 0B 03 73 00 83  ..P...ff.....s..
    00000010: 00 0C 00 0D 00 08 11 1F  88 89 00 0E DC CC 6E E6  ..............n.
    00000020: DD DD D9 99 BB BB 67 63  6E 0E EC CC DD DC 99 9F  ......gcn.......
    00000030: BB B9 33 3E 50 4F 4B 45  4D 4F 4E 20 42 4C 55 45  ..3>POKEMON BLUE
    00000040: 00 00 00 00 30 31 03 13  05 03 01 33 00 D3 9D 0A  ....01.....3....
    Raw title: b'POKEMON BLUE'
    MBC type: MBC3
    ROM size: 0x100000 bytes
    RAM size: 0x8000 bytes
    Dumping 4 RAM banks to pokemon_blue.sav...
    100%|███████████████████████████████████████████| 32768/32768 [00:16<00:00, 1968.87it/s]
    Visit original content creator repository https://github.com/jamchamb/cojiro
  • SLID-on-Microcontrollers

    SLID on a microcontroller

    For the ETHZ course of Machine Learning on Microcontrollers we had to come up with a project idea that uses a neural network which can run on a STM32 UC with limited resources (64kB RAM, 1 Core running at 80MHz). We decided to use the onboard microphone and detect spoken languages in real-time.

    Project Overview

    Signal Processing and Feature Extraction

    The onboard microphone samples the audio at about 8kHz which was found to be enough, since human speech is mainly in region of 200Hz-4kHz. But even at 8kHz the RAM is filled very fast. Hence, we calculated MFCC features every 256 samples with an overlap of 50%. 12 mel-bins are used, and we aggregated 625 frames before making inference, which is about 10 seconds of speech. image Since this needs to be done in real-time, CMSID-DSP was used which can calculate the MFCC features in Q15 very fast. It has a python wrapper which we used to train the network on the right features already, because they differ a lot from librosa or pytorch implementations! The model was trained using keras and converted to a fully quantized int8 network with tensorflow-lite. This reduced the weight size from 2523 kB to 651 kB while the accuracy only decreased by 0.03%.

    Convolutional Neural Network

    We used a simple CNN, because the network weights need to fit on the ram during inference. The dataset was the Kaggle SLID dataset, where we had several papers as a baseline. image

    Model comparison

    We wanted to compare our model accuracy with other model types and implementations from other papers. In the following table one can see different important factors, such as Flash and RAM needed, which is our main constraint. Luckily our model performed extremely well on the dataset despite its small size while having an inference time of about 4 seconds. image

    Prerequisites

    The project was developed on Windows 10. You will need CubeIDE with the Ai Extension. To easily compile the cmsis-dsp library Ubuntu on WSL2 is used and python and anaconda is installed on the subsystem instead on Windows. All python scripts are run on WSL!

    The platform is an STM32L475.

    Installation

    • clone the repository

    From here run all commands on the Ubuntu subsystem:

    • create a new python environment on WSL using e.g. conda conda create -n slid python=3.8 and activate it conda activate slid
    • install the requirements pip install -r requirements.txt
    • download the dataset kaggle datasets download -d toponowicz/spoken-language-identification
    • extract the dataset and copy the train and test folder to the folder audio_processing
    • from the project root folder run python3 audio_processing/generate_dataset.py (this takes some time)

    Now you will find a folder names as cmsis_[sample_rate]_[num_mel_bins]_[num_mel_windows] that contains the converted mel spectograms as npz files.

    Train the network

    In the model foder you can find the config file. If you want to track training using WANDB you can put in your API key there. The root entry should be the name of the just created dataset with the npz files.

    Start the training from the project root directory with python3 models/train.py

    Once the model has been trained it will be saved as h5 file. Quantize the network with python3 models/tinify.py. This will generate a tflite model.

    Deploy

    Start CubeIDE with the CUBE-AI plugin and load the project from the CubeIDE folder. If it doesn’t work try downloading an older version. Once the upload is done, connect to the STM via serial and press the onboard button to start recording.

    This part is the most complicated as CUBE-AI seems to have its bad days often. Probably it is better to generate a new project from scratch and convert the settings and code to your version.

    Visit original content creator repository https://github.com/matvogel/SLID-on-Microcontrollers
  • Sorting-Simulator

    Sorting-Simulator

    Program that simulates sorting arrays with multiple threads and different algorithms.
    Please see the Wiki to learn more.

    Download

    You can also Download the Java 10 version. This version works identically, but is slightly faster due to improvements in Java. The problem is that the default Java download still links to Java 8 (because Oracle is weird), so that is the default download link here. If you have Java 10 installed, you should download this version.

    To use the program

    1. User sets the size of the array of items to be sorted.
    2. The user sets the order of the list of items to be sorted.
    3. The user enters integer value of the smallest item in array and the largest item in array.
    4. The user chooses the block size, which is the number of items in the array are to be sorted in parallel on different threads.
      a. If the block size is greater than or equal to the size of the array, then one thread is used.
      b. If the block size is less than the size of the array, then multiple threads use the selected sorting algorithm, with the array split into multiple arrays equal to the block size. The last block size is the remainder elements. After all threads are complete, they are merged using Merge Sort.
    5. The program displays the time taken to sort the array.
    6. The program displays the array in the console.

    Input Type

    How items in the array are generated.

    Already Sorted

    Generates an array of numbers increasing in size, starting from Smallest Number and ending at Largest Number.
    The generator attempts to have a balanced amount of each number based on the input size.

    Reverse Order

    Generates an array of numbers decreasing in size from Largest Number to Smallest Number.
    Balances the number of appearances of each number based on the Input Size.

    Random

    Generates an array of a bunch of randomized numbers in the range between Smallest Number and Largest Number.

    Input Parameters

    The text fields for user input. The generator will generate integers between Smallest Number and Largest Number. The number of generated items is based on the Input Size.
    If a non-random Input Type is selected, then the generator will try to create an equal number of each generated integer.
    For example, if the user inputs

    Input Size = 10, Smallest Number = -2, and Largest Number = 2, Input Type = Already Sorted

    then the generated array will be

    -2, -2, -1, -1, 0, 0, 1, 1, 2, 2.

    If the user inputs

    Input Size = 6, Smallest Number = 0, and Largest Number = 12, Input Type = Reverse order

    then the generated array will be

    12, 10, 8, 6, 4, 2.

    Input Size

    The number of generated items.

    Smallest Number

    The lowest value integer in the generated array.

    Largest Number

    The highest value integer in the array.

    Block Size

    The number of array items in each thread.
    The program splits the sorting into multiple concurrent threads based on the Input Size / Block Size. At the end, the individually sorted arrays are merged via Merge Sort.

    Visit original content creator repository
    https://github.com/Aashishkebab/Sorting-Simulator